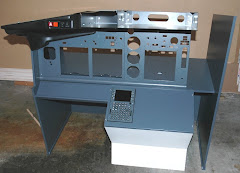
A rainy, miserable week in San Francisco. Plus the wife's out of town on a 2 week business trip! Yahay! More anorak time.
This week focused on getting the EICAS screen ready. What you need is a 10" LCD display. Not easily come by in this day and age of huge TV screens but you can find them. I got this one on eBay for $40 - it's a miracle! (sorry, couldn't resist):
Now the thing with this monitor is that it has an external power supply, so less concern about killing yourself when you take the back off and plug the thing in. Plus I won't need to make any special shielding for the power supply, since it already is.
So here it is with the back off and the warranty (what warranty?) voided:
Now for some reason Blogger has rotated this photo and I can't figure out how to change it. Sorry. Also since I walked you through a screen redo in a previous post, I'm not going to dwell on it a second time. Suffice to say that even with the plastic case off, the chassis is too big to fit in the slot on the center panel. So out with the snips to trim it down and a redesign of the brackets that hold the LCD panel to the chassis. I also trimmed down the plastic case to give the innards some protection, which I skillfully attached to the chassis with.... duct tape. Draft excluder on the screen front to protect the Plexiglas screen on the center panel, and voila:
Bride of Frankenstein? Could be. You'll notice I left the tabs on the bottom, this is so I can affix it to a mount. And does it still work? Yes:
"It's a miracle!" I hear you say! (ok, enough with the miracle jokes). Now it's small enough to fit in the center panel and still have clearance for the landing gear lever (which doesn't line up with the pre-drilled holes in the center panel - nice work Engravity!) and the standby gauges. I'll get it mounted this weekend.
Other project this week was to come up with a working dimmer circuit for the panel backlighting and for an LED strip I'll mount under the glare shield. It isn't as simple as just putting a potentiometer in between the LEDs and the power supply (trust me, I tried). You need to build a circuit that switches the power to the LEDs on and off so fast, you can't see it. You control the duration of how long it's off by using a timer chip, a transistor, a couple of diodes and a potentiometer. Here's one I found from Bill Marsden (you'll need to register to see this but I highly recommend the site anyway) via the esteemed Sgt. Wookie.
I've been messing around with the design for a couple of weeks and couldn't get it working. I finally broke down and purchased a couple of prebuilt units from these guys. Wouldn't you know, since the shipping time (from Hong Kong) is so long I thought what the heck, let's give Bill Marsden's circuit another try. I realized I had the capacitor rating wrong, popped in the correct ones and the things works like a charm!:
Sorry, hard to get it all in focus - that's the potentiometer in the foreground and the LED strip at 50% brightness over my test board. Next step is to fit all of the components on the circuit board the chip is already mounted to.
While at it, I thought it was time to tackle the panel backlighting kit from Engravity. They really don't give you much to solder onto. At first I was worried about melting the plastic backing with the soldering iron, happy to say it has a higher melting point that solder so it was ok. I had to use some stripped down cat 5 wire to get it in there but here's the result:
You really need to ensure that there is no solder between the contacts otherwise (of course) you'll have a dead short. You'll notice I also put some heat shrink tubing on the leads to give it some projection from the panel. I must say though that when you light these guys up, they look magnificent! I'll save the photo for when I have them all mounted to the panels.
Progress on the software side. You'll recall that the autopilot wasn't working properly last week. I installed the latest release of Project Magenta and made sure the Netdir setting was correct. Now working fine. I still have the problem of the flight plan not being displayed in the ND, rather it shows the direct route to the destination airport. So I still need to work on this.
What else? Moved the weight bench and rowing machine out of the room, so my plan for the weekend is to re-arrange the guest bedroom and maybe even get the base built to mount everything on. More later - the sun is out and the dog needs walking...


No comments:
Post a Comment