One of the plus sides of the Continental - United merger is that I get to fly on a lot more 737s than I used to. Last weekend I flew down to LA to meet up with friends and snagged this photo shortly after departing KSFO 1L
Destination: Gianluca's cockpit. He and Linda graciously offered me dinner and an hour or so on his sim. We've been in touch over the years and Gianluca was probably the first to contact me after reading this very blog. Checking the blog history we discovered that December 8th 2009, 3 years to the very day we were getting together, I made my first posting. I can say without hesitation, Gianluca has come along a lot further with his build than I have:
And apologies for the shaky photos folks, all I had on me was the iPhone.
He has an overhead in that he put together himself and what an impressive job!:
Especially the wiring...
Given the enormity of the task and my lack of free time, I plan on going with the SimWorld plug and play version. It really adds to the experience and I know it's only a matter of time before I breakdown and place my order.
Now back to the flying. We decided on a quick flight from LAX to SAN then back again. The flight down was in the dark. As was I for most of the time... It has been so long since I've flown I was flubbing things left right and center. It is amazing how quickly you lose the muscle memory. Gianluca was very patient and was doing his best to be my FO, even though there was no seat or easy access on that side.
Landed at SAN ok. Came down just on the threshold, possibly a little short. No time to mess around, we switched to daylight mode, took off then flew back to LAX.
On the way we noticed that we were low on fuel on the left tank, the center tanks and right tanks were not being consumed. While Gianluca tried to figure out what was happening there, we lost both engines about 30 miles out from the runway. I disengaged the auto pilot and hand flew the plane while my FO tried to get the motors running. No luck.
Interestingly, you shouldn't be able to start the APU with no fuel in the left tank. It started but the engines wouldn't. Not sure if it was a logic issue with the overhead or whatever - we decided to try dead sticking the plane to the planned landing on 24R at LAX. Gianluca has a super scenery package installed (sorry, I forget the name) and he wanted me to see the detail.
We planned on lowering the gear at the very last moment so as not to introduce yet more drag. It looked like we were going to make it. Airspeed was ok and we had enough altitude to land the plane. I think I had flaps at about 10 degrees. Seconds before touchdown we were falling beneath the glideslope and the speed was bleeding off rapidly - nothing for it, drop the gear. And boy did we drop! Right into the In-N-Out burger parking lot on South Sepulveda Boulevard.
You can see from the photo above how close we were to landing safely. And the scenery package was very good - you could see the sign whip by, pretty much the way it looks in the photo. We overshot the drive through, crashed through the perimeter fence and onto the runway. All just as well, our non-virtual dinner was ready.
Many thanks to Gianluca and Linda for a lovely evening and for a reminder for me to get on with this project and fly more often than I do.
As winter closes in and my crazy travel schedule tapers off, it's time to get back to work on the sim.
As previously reported, I have most of the parts for the first officer MIP. This means redesigning the cabinet to house everything, along with the base the captain's side is currently sitting on. Before cracking on with that, I should probably focus my attention on the control column mechanism, since it will determine the height of the base. Hence the post title - lets start with the floorboards and move up from there (cue Paul Weller...).
While I'm at it, it's really time to consider how am I ever going to move this thing when finished? The new design will be more modular and will be easier to bolt together and tear down for maintenance. But first, the control column set up.
I've taken Ivar Hestnes' design as a starting point. You'll find it here. It's really quite ingenious. Especially the use of gas struts. I've failed miserably to find a strut which in its neutral position is neither compressed or expanded. My hope was to find something that would return to neutral after being pushed or pulled. Ivar gets around this by mounting regular gas struts in aluminium tubing. Very clever but I don't have access to welding equipment. And I'm too cheap to have someone weld it for me.
Which got me thinking, since even Ivar says his welded steel frame design is overkill, what if I made mine out of bolt together angle iron instead? It's cheap enough that if it doesn't work out, I can always use it as a prototype for the finished thing. Much easier to bolt and unbolt things than to weld and un-weld.
Armed with nothing more than the following tools on hand, I got to work using Ivar's dimensions:
A cut off saw:
4" grinder
A Swanson speed square
A hacksaw (surely you don't need a photo of one of these...)
Now before I show you the work in progress result, a quick reminder about safety with power tools if you intend to have a go yourself. Wear the appropriate safety gear and know what you're doing. When using the cut off saw and grinder, there are sparks flying everywhere. I was about to set to with just my glasses on when the wife stopped me in my tracks. Out came the full protective goggles to go over my specs.
And here is where we are so far:
Standing up on its end is one of the 2 control columns (3" pipe). It stands on the (soon to be) pivoting structure made with 2 bits of 2" angle iron bolted together. The pivot arms are made of more of the same. The rest of the frame is made out of 1 1/2" angle iron. In the foreground are 2 bits of 2" angle iron that will support the "gas" struts (more on this in a minute). Here you can see the beauty of working with angle iron - the brace on the right as been moved further to the right to "dry fit" the positioning of the strut (the left has yet to be moved). All easily done with the turn of a wrench.
Some tips if you try this yourself:
Cut matching pieces at the same time with the bolt holes lined up together. This will result in a more square structure
Assemble everything on a flat surface
Use a speed square (or something similar) to make sure all of your angles are at 90 degrees
Use bolts that are smaller that the cut outs in the angle iron. I used 1/4" bolts, the holes are 3/8". This allows you to fine tune the position of everything to ensure an accurate fit
Use locking washers to hold everything together tight
Make some simple braces to add to the rigidity of the frame (see left and right on the central spar)
Not shown in the photo, I also purchased some 1 1/4" square tubing to handle the torsional forces of the main pivot point. This will simply be bolted to the frame.
More close up shots for you:
Now I know this all looks a bit vague right now. It will come together in the coming weeks and I'll share progress with you.
Back to the "gas struts" and the main gubbins of this construct. I found another cunning design from Aerosim Solutions in Australia. He uses screen door closers to pull the control columns back to neutral. To get around the fact they only operate in one direction, they have come up with a slotted disk that allows the opposing closer to "disengage" when the rotation is in the other direction. Check out this video and you'll see what I mean (skip to 3:30 if you don't want to watch the whole thing):
Much easier for to fabricate a slotted disk than welding aluminum tubing.
As for the main pivot point, Ivar uses 2 x 1/4" steel plates! Way too much methinks. To prototype I simply cut a couple of pieces of 1/2" inch plywood, screwed them together and drilled all the holes the way Ivar had them. I may change this design to facilitate the Aerosim slotted plate design, here's what it looks like set on top of the frame with one of the 2 screen door closers:
The screen door closers are a great and inexpensive idea. I bought 2 heavy duty units from Home Depot at $10 a pop. The great thing about them is that they have an adjusting screw on them to control the rate of pull. Will they have enough pull to bring the columns back to neutral? That's the next step to discover. Stay tuned - flange bearings are on order from Amazon.
To close, the frame is lightweight - one person can easily pick it up, it's cheap, requires minimal metal working skills, allows for experimenting with placement etc. and appears to have enough strength to handle the loads we'll place on it.
Note: Re-posted with additional photos and bit more blether here and there...
Popped over to the UK for a very brief visit between business in France and Germany. While there Kevin, my brother in law, took me over to Blackbushe airport to show me around a charity fund raiser for Aerobility, an organization dedicated to providing the disabled with an opportunity to fly an airplane.
Kev is an air traffic controller in the UK. Along with his fellow members of ATCOS, they are heavily involved in the fund raiser. The idea is to beat the work record for longest flight simulator session, per rules laid out by the Guinness Book of Records. The goal is to raise £100,000 to cover the costs of the simulator and maintenance for 5 years. This follows a successful fund raiser for an actual plane, a TECNAM 2002JF they acquired for the charity.
Here are some pictures I nicked from other websites. First, some pictures of the sim, a Piper PA28
The big clock on the nose of the plane is for a time lapse camera, to demonstrate to Guinness that they really did fly the plane for the full duration.
There was no one there with any technical knowledge of the sim when I visited. Best I can tell it was a Microsoft Flight Simulator set up, with 5 projectors beaming on flat screens, as shown above. The rig was fixed, ie no movement of the platform. The plane looked like the body of a real Piper. The MIP seemed to have a couple of flat panel displays behind cut outs for where the various instruments would be. A very tidy job all around.
Shown below, the flight progress to the point in time I visited:
One of my personal heroes took a couple of stints at the yoke, none other than Buzz Aldrin. I got very close to him at the Evergreen Aviation and Space Museum a few years back but never got to shake his hand or let him know how much of an influence he had been to me as a kid. On the drive back, Kev casually mentioned that he did get to meet him, grab his hand and exchange pleasantries. Lucky bugger!
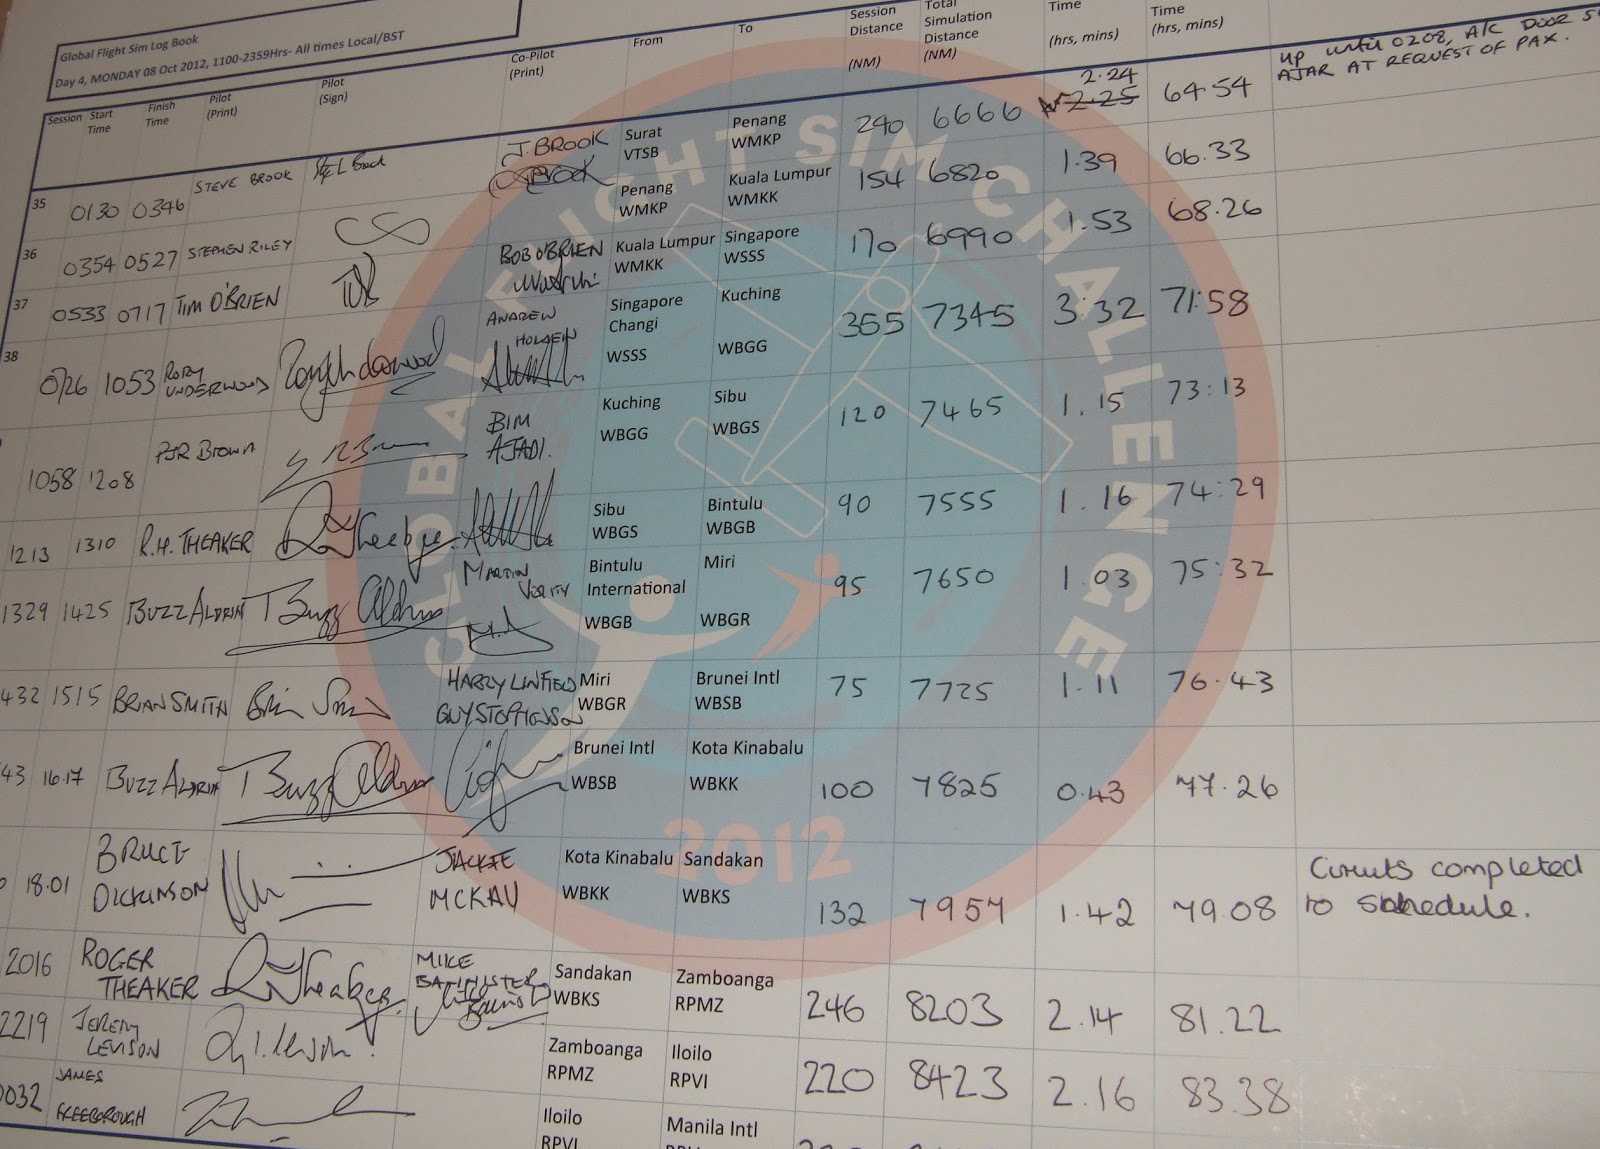
You can see his entries in the log book below. Looks like former pilot of "Ed Force 1", Iron Maiden front man Bruce Dickinson also had a go:
Headed north on a business trip yesterday. Flew over parts of Northern California that are battling forest fires. Most of the airspace around Redding and points north into Oregon were covered in smoke. I snagged these photos from my window seat (Embraer 190 if you're curious). That's smoke you're looking at, not clouds...
I did meet up with Mark from Flight Illusion a couple of years back and asked why didn't line up the holes in his gauges with what must be the most popular panels (FlyEngravity). He said he would think about it so it was with some hope that action had been taken before I purchased the latest batch. To answer Carlos' question, here are some photos. First the brake pressure gauge:
No. The screw holes in the gauge are in the corners, the drill holes in the panel are aligned along the center. will be using double sided tape again to install this one. Incidentally, after 2 years of Californian climate, the double sided tape trick is still work, nothing has fallen off.... yet.
Now the chrono.
Looking good! Screw holes in all 4 corners. Let's drop it in there and see how it lines up:
Fail.
An Olympic update from my brother-in-law (wait, didn't it end already?) on the British term Anorak. If you scroll to the bottom of this link http://www.bbc.co.uk/news/magazine-19093328 you'll get the latest. Apparently we're harmless - good to know.
And finally, the blog of the fantastic Andre who must hold the world record for building his own 737 shell! http://boeing737simulator.blogspot.com The man is on fire...
Who could resist reading a posting with such a great title? You, my fellow anoraks.
My day job is seriously interfering with my hobby. For example, I'm off to Europe again this week - somewhat of an unscheduled but necessary trip. Thus progress has been slow and mainly in the planning area.
Given the lead time for their gear, I've ordered up another Flight Illusion digital clock for the first officer (I wasn't going to do it but couldn't resist - an empty space in the MIP is a hole in my soul) and a brake pressure gauge (critical for landing and plugging another hole in the MIP).
Also noticed their new radio magnetic indicator with DME. Looks very nice and have enquired if it will fit the MIP or if customization is required:
Also asked if there are any plans for a combined airspeed and altitude gauge. If so, I'll be selling off the separate current ones I already have.
What else? Had a visitor over last Saturday who wanted to fly the sim. I ran Ken through some basics (he has never flown a 737 or a sim like it) and he got it off the ground no problem. Switched to the autopilot while climbing out of KSFO. All going well. Then while we were looking down at the PFD, all hell broke loose! Clearly something had gone wrong and the autopilot couldn't control the flight. I disengaged it while trying to figure out what was wrong. Ken did a remarkable job for a rookie, getting back to straight and level flight after a couple of wild pitches up and down and some rolls that would have the passengers barfing in a heartbeat.
Checking out the TQ, the trim indicator was pegged out at full nose up.... I thought I'd fixed this problem with some SIOC script changes but clearly not. We didn't have time to reset and try again so will need to spend more time trying to debug this damn piece of junk! The real annoying thing is that when Ken expressed an interest in having a go, I ran through a test flight before he came over and everything worked flawlessly. Murphy's law I guess.
And talking of Murphy, check this video out. Wonder if the captain is still flying for the airforce? Fine job of setting that sucker down though...
Back from my latest tour of Europe. Waiting for me was a nice big box of goodies from our friends at Fly Engravity. Yes, the first officer side of the MIP with all the switches and what not have arrived. Time to break everything down and start afresh.
This weekend I'll get a start on pulling the sim apart, hopefully for the last time. I need to replace the MIP stand with a full width model. The raised base will also go and will be replaced by another that is also full width. I'll use 2" x 6" lumber this time to give me more to play with in terms of the control column base. I won't be adding a first office yoke or pedals now but would like to have the option for this in the future. I'll also come up with a more modular design that will make it easier to maintain the entire rig. For example, screw down floor panels rather than carpet.
Incidentally, I was cruising my usual sites for information and saw that Rudy was selling his control columns, yokes et al. For a moment I thought maybe I could save some time by buying his. Sadly though, it sold in no time. I've always admired Rudy's work and have looked at all of his build photos, especially his control columns. Puzzled as to why he was selling, I dropped him a line. Answer: Looking for a more realistic set up, self centering with the possibility of motorization. As always, he continues to inspire me.
My new design will also allow for the addition of a shell. It will be constructed of at least 4 separate parts, 2 sides, the window frames and a roof. If I ever get around to building the overhead, it will be an integral part of the roof design.
For now though I just want to get my sim room emptied so I can paint the walls, replace the carpet with a hardwood floor, gut the closet to put my desk in there instead, run wires for the projectors and build the wrap around screen. Doubt I'll have much to show for a while but when I do, I'll post the photos.
As you'll notice from the panel on the right, my new desired end state has changed to the full size cockpit. And to close, a photo I took over Greenland last week of a huge glacier. Sorry the window was so dirty - United, are you reading this?
Ps. While in Germany I visited the Sinsheim Technik museum with my buddy Bernd and his 2 kids. Got to clamber around inside a Concorde and a Tuploev TU-144. How cool is that?
Yesterday we had an almost total solar eclipse in northern California. I was in the yard working on the irrigation system (irritation system as I prefer to call it) when I noticed that the sunlight was getting dimmer. I set up a simple pin hole camera to show the missus what was going on.
What I didn't expect was that the dog would get freaked out by what was happening. She jumped in my lap and by a fortunate coincidence, my spectacles were creating a better image on the white board than the pin hole camera was! Photo courtesy of the missus - shadow courtesy of the dog:
And for those of you who want to try this at home, note I have my back turned away from the sun, I'm not looking directly into it...
Got back from a business trip to find a parcel from CPFlight. It's the returned MIP board which according to Paolo, is working just fine. Since I made the decision to go full size on the cockpit (more on this later) and since Paolo has been very patient with me, I ordered a second EFIS for the first officer's side. Both board and unit arrived in good shape.
A quick test Friday. I powered both the MCP and MIP board separateley, plugged the board into the MCP and dual EFIS units, then ran the CPFlight test program. Result? THE BOARD IS NOT WORKING! See how the glare shield lights are grayed out? Ah ha! Vindicated - I'm not going bonkers. I'm right and Paolo is wrong.
After a night of mulling it over I thought, what if it's because I didn't have anything wired up to the board? Maybe it's the old EFIS unit playing up, since everything gets daisy chained through it?
Today I ran 2 more tests. The first I simply wired up the six pack to the MIP board, plugged the FO EFIS into it and ran the MCP to the EFIS. Here are the results:
The darned thing is working! Must be the captain's side EFIS. Second test, joined the EFIS units, ran the MIP board to the captains side, FO plugged into the MCP. It's working again!
Ok, I'll now unplug the six pack and see what happens. Same results! It's working! What are the variables here that meant it didn't work before but now it does? Is it the power up sequence? In the next test I powered up the MCP before the MIP board. Same result - all checks out ok...
Now do you see why I'm on the brink of going bonkers? Paolo is right and I'm wrong... I'm going to design an interface board to make it easier to swap out the MIP board in the future. Wiring and un-wiring every connection in the MIP is a pain in the rear - anything I can do to simplify will be time well spent. I fear we will see more problems with it down the road.
Other developments for you. As you may recall, last year I purchased a more realistic yoke to replace the CH Products mash up I made. First order of business was to find a new tube that would fit the yoke neck. The local home improvement stores didn't have anything that would work so I started asking mates for any tubing they might have, including Bob up in Oregon, a fine home brew maker and a stunt double for the guy on the Burt's Bees packaging. Nothing doing.
Quite by chance I happened on a metal supply company less than a mile from the house. In and out in 5 minutes with a piece of 3 inch metal tube cut to length. The neck fits perfectly.
I plan to redo the yoke damping mechanism and will experiment with a design I found here. More details to follow.
What else? Order the first officer panel,electronics and what nots from Fly Engravity this week. I'll be heading out again back end of next week on a long trip to Europe, hope to find the package on the doorstep when I get back. Means redoing the MIP stand etc (think I'll use plywood this time) but I figured it best to get the exact MIP dimensions before making the outer shell - my winter project is already planned.
As you know, I've been having problems with my CPFlight MIP board. I've been in extensive email exchange with the guys in Italy to figure out was going wrong. How extensive? 44 emails (including requested photos of my set up) back and forth trying to figure it out! Admittedly I didn't help the process by misnaming one of the components in my "I'm sure I'm right" descriptions. I learned something from that...
Bottom line, I shipped the board back a week ago so Paolo could take a look at it. From my end the thing had gone none functional since applying power directly to the board. I was convinced it was blown. Paolo plugs it in and.... it works flawlessly! It's on its way back to me where I will (for the 3rd time) reconnect all the wires and try again. Or maybe not. First I will video document me connecting the thing to the MCP, the 6 pack, EFIS and 1 radio. Then if it works - hurrah! If not, what the heck is going on! Maybe the problem lies with the MCP - we shall see.
Received 2 bits of feedback this last week on the blog. First was a really nice email from Tom, a somewhat local anorak. He took the time out to give an assessment of my blog and writing style. I'm thrilled to report he nailed in his description the kind of tone I'm trying to get across. He also briefed me on his build plans. If I can help out, happy to do so.
Also received a comment from Shweta asking for more information... happy to oblige although I'm not entirely sure what kind of information you're looking for.
There's a small window of opportunity this weekend for me to work on the build. Then I'm on the road again for more or less the next 6 weeks. May be a while before I post anything of significance but of course, will keep you all informed of progress.
We had a visitors this weekend, Gianluca and Linda. Hard to believe it's been a year since they were last up this way! This time around I had Gianluca do the flying (to be honest I had too much wine at dinner to be much use myself). He did an excellent job considering my sim was new to him and that he didn't have the luxury of a working MIP (the CPFlight MIP board blew out about a week ago - more on this later).
After a smooth landing in San Francisco, we tried out a utility I recently purchased call FS Instant Approach. With it you can set the plane up for any airport/runway in your simulator, specifying how far out you want to be, weather, visibility, speed etc:
We noticed a bit of a hiccup - when you switch to FSX and take it out of pause, the throttles firewalled! A brief pull back on the levers and normal behavior was observed. This could be set up dependent. When I tested it again today for these pictures, I didn't have my TQ or Prosim turned on and the engines were running under the command of the A/T.
The pause feature is quite handy though. Since the utility has no idea of what other software you're running, it gives you time to re-program your FMC and get the rest of you aircraft squared away for approach. With this done, come out of pause and in my case, adjust your thrust settings.
In this example I set visibility to 2 miles and as you can see, created a typical San Francisco summers day:
I flew the approach and caught sight of the runway in time to make my go/no go decision:
One feature of the utility is that you can view your flight map "in Google maps". A bit of a con really because the software uses the vendors website to show the flight path taken:
I've made a number of test flights and only 3 are available to view. Plus you can only see the flight track, would be better if you could also see the altitude and have it displayed in Google Earth rather than their half baked version of Google Maps. Some kinks to work out there boys. For $14 though, not bad at all.
Gianluca also left me with a generous gift - some projector screen material! What a gentleman!
Well I've gotten about as far as I can with wrinkly paper and a version of Warpalizer that doesn't save its configuration. I purchased it today but it requires a "dongle" (something that plugs into an otherwise usable USB port) that verifies the software as being legit and not some knock off. It's being shipped from Norway so it will be a week or so before I can get Warpalizer up and running properly.
"What is Warpalizer?", I hear you say. It's software that bends (or warps) the projected image on a curved screen so that to the observer, everything is the same focal point and is distortion free. Without it your 3 projector set up looks funky as all get up. Now the challenge with the evaluation version is that it doesn't allow you to save your settings and sometimes a change in focus in windows (ie. you switch to FSX) will cause the settings you made to disappear. This photo gives you an idea of how Warpalizer works:
You use the edit function to make all of the rows appear to be equally spaced and in proportion to each other. I could only get this in so so shape since the butcher paper screen sags and bunches up unevenly across the projection field. Sometimes I was staring at the image not sure if it was the paper or the warping factor that was out of whack (it was almost always the paper). You can also set the edge blending, where the 2 project beams intersect (on box 11 and 22).
Per my opening sentence of this post, I've tested about as much as I can with this prototype rig. Plus the wife wants to park the car in the garage so tonight I pulled it all down.
Just for giggles, I took the semi circle base of the frame into the sim room to see if it would fit. Oh my it's tight! It works though. I can't wait to re-arrange the room, get the projectors mounted on the ceiling and install some kind of screen. Plywood or a screen hanging down from the ceiling? Will need to think about this one.
What else? Happy to report with all projectors running at 1280 x 800, FSX was managing 30 frames per second while on the ground in SFO. Haven't tried it on an "add on scenery" airport but so far, performance doesn't look like an issue.
Spent a couple of hours testing tonight. First off, got the Nvidia cards working in SLI mode with one big expanded desktop at 3840 X 800 resolution (each projector is 1280 X 800). Loaded up FSX and tweaked the window settings. More work is required here - later. Fired up an evaluation copy of Warpalizer. It took a bit of trial and error and I'm by no means finished but here are some preliminary results:
I need to make some physical adjustments to where the projector beams intersect. The edge blending from Warpalizer works quite well though. Also, the fact that the projection surface is not completely flat causes problems in the projection too. For a proof of concept though, I'm thrilled.
Here's a closer look of our fair city:
I may tinker around a bit more tomorrow but next step is to purchase Warpalizer. I can't save the config in the evaluation mode and I really need to get a laser level on the test grid lines to make sure everything is where it ought to be. Again though, very happy with the results!
While waiting for our friends at CPFlight to get back to me on the (second) blown MIP card, I thought I'd turn my weekend attention to the external visuals. My goal for the weekend was to prototype the setup in the garage, to check on all of the dimensions and geometry. This way I'll know for sure if my plans will work, before turning the guest room completely upside down to get the rig in there.
I wanted to do this on the cheap, since it won't be used beyond the prototype. I turned to 1/2 inch PVC irrigation pipe for the framework. They run about $1.50 for a 10 foot length and the slip together fittings are cheap too. Calculating the required lengths using high school math, I came up with this:
Not the straightest of frames but it will serve my purposes. Next I taped together 3 runs of butcher paper and clamped it to the frame
Again, not perfectly flat but good enough for the prototype. In the final set up the projectors will be mounted from the ceiling. Today I can set them on the ground to check for coverage, positioning etc. Much easier to make fine adjustments here than on the top of a ladder:
From a previous posting you'll remember that I have 2 double port video cards in the FSX system. I hooked up the projectors via some HDMI cables and here is the first result:
I'm standing in the way there to give you a sense of scale - this screen is huge! The radius is 60 inches and the screen width at 220 degrees is approx. 253 inches. As you can see, I need to resize the FSX windows to get the appropriate edge overlap. I also installed a trial version of Warpalizer to blend the projector images and bend the image into shape. We had guests coming over for Easter dinner so I had to cut the tests short. The wife's given me another 24 hours of grace in the garage - I'll run more tests tonight.
Gianluca emailed me today saying he will be in town in a couple of weeks. It's been about a year since he and his lovely F/O visited. To be honest, there's not a lot of progress to show in the last 12 months - I was shamed into getting back on it today.
There were some things I wanted to straighten out so here's the punch list for today:
Get the upper EICAS screen working
Fix the annoying connect/disconnect sound the TQ makes all the time
Sort out the terrain display in the nav display
Fix voltage drop on my CPFlight units
EICAS
Easy enough. Plugged the second monitor into my new Dell system and extended the desktop over the 2 screens. Created a copy of the ProSim display folder and added a new shortcut to the desktop called EICAS. Once I had the ProSim display situated, I clicked on the "fullscreen" option and it held its place on the second, 10" monitor. Fired up the other display and all was well. Cool. I can finally see what the engines are doing and how much fuel I have left. Handy.
Connect/Disconnect
A "feature" of the wonderful Revolution Simproducts TQ. I followed their fix it guide (you can find it here), first by changing the power options in Windows 7 (made no difference) then by adding a powered USB hub. Doing this meant I had to change the SIOC ini file but I'm wise to this now! Still no difference although once I got the sim fired up, the problem seemed to go away.
Terrain Display
This is a great option in Prosim737. I don't believe they have it Project Magenta and if they do, it's probably in that annoyingly named module called Wazzup. I'll tell you what's up, the thing isn't documented I could never get it to work. With Prosim though, it's a breeze.
First check your cockpit settings in the instructor station:
Make sure the "vertical situation display" option is checked. Also, install the terrain data files on the computer that has the cockpit displays running (more on that here). While I was in this screen, I noticed a setting for weight in kg or lbs. In my previous post I mentioned I preferred pounds, so here is where you set it. FMC works like a champ now.
Here are some examples of the terrain display. I'm making an approach to KMFR (Medford, Oregon), ILS14, coming in from the south. The area is mountainous and you can see where my descent is taking me and at what altitude I'll intercept waypoint KUSHI at the current rate:
In this shot, I've made the base leg and I'm heading to waypoint SAMIE. If I continue on this heading and descent rate, I'll clip the top off a mountain - not good:
Next shot you can see the remaining waypoints and the runway. I better get down sharpish - you can see I'm in level flight and I need to get the nose down to intercept the glideslope:
Last shot I'm on short final and more or less on the glideslope. See how the mountains on the other side of the runway are highlighted in yellow? If I mess up the landing and go around, I better start climbing in a hurry:
Fix voltage drop on CPFlight modules
And this is where we take a step backwards...
I've been in touch with CPFlight since I noticed that the radio displays would flicker when the solenoids that release the fire handles would kick in, during fire drill tests. They recommended I add a second power supply, one to the MIP card and keep the existing one plugged into the MIP. This I did and moved the jumper on the board to the "I" position so that it would take its power internally.
It didn't work. Unplugged the power to the board and reverted to the "E" for external setting. Nothing. The MIP is working but the board has quit on me. This is the second one that has died - I await further instructions from Italy before making any more improvements to the sim. Replacing the board is a pain since it requires rewiring every connection. Hope that isn't what's required.
Since I'm so easily distracted I'll share my review of Prosim 737 over a number of posts, comparing how it performs over Project Magenta. First, a brief test and short video of an engine fire drill.
The hardware is a CP Flight fire control panel and Fly Engravity six pack and warning/caution buttons. Bottom line - without any configuration, the systems work plug and play. The instructor station where you dial in the failures is self explanatory and automatically triggers cascading failures based on what you set up. I could never get this working with Project Magenta. Heck, until now I couldn't use the fire control panel other than through the CP Flight test program.
My second observation (not captured in a photo) is that Prosim 737's emulation of the FMC/CDU works better than Project Magenta in one respect - the altitudes set on waypoints in the STAR don't change as you progress to landing. Now this might be how the real CDU works (feel free to correct me) but I always found it really irritating that in Project Magenta, the altitudes would change, varying from the published STAR. I even noticed this on the commercial sim I flew in Sydney (they too use Project Magenta).
What else? Oh I got the TQ working again. In SIOC the 2 motor devices got swapped (don't know how). Once reset in the SIOC config, most seems to work fine. Air brake is still stuck in the armed position - still need to figure that out.
All for now - will report on more findings as I go through the shake down tests.
Still here folks. Unable to do any work on the external visuals for scheduling reasons, so I switched attention to getting ProSim 737 installed instead.
One of the things that has always bugged me about this hobby is the number of computers you need to run to simulate all of the systems. Then I read this article in the prosim forum that got me thinking differently. The author of the post figured out that with ProSim he could run all of his avionics from 1 computer and then run FSX from another. I decided to go this way too.
First, decided to buy a reconditioned Dell XPS system with an Intel i7 chipset. It came with a 1.5 TB disk (more than I need), 8GB of memory and Windows 7 for a screaming deal. I can't complain.
Installed the ProSim display and cdu modules on it. On the FSX system, I installed the ProSim server and the MCP module (as recommended by the ProSim guys). A bit of tweaking of IP addresses and everything is speaking together just fine.
A couple of wrinkles to work out... the CDU/FMC only accepts kg for ZFW. I'm kind of used to using lbs myself. LNAV seems inop - will need to get to the bottom of that. Also looks like the NAV radio auto tuning is AWOL, another thing to check.
The biggest issue though is my good friend the Revolution Simproducts motorized throttle quadrant has decided to not perform after months of sitting around doing, well, nothing in particular - nothing at all in fact. Advancing the levers manually results in no change in FSX. The MCP is working, pressing N1 spools up the engines in the sim but the throttle levers don't budge. The trim wheels turn a little on power up and then stop. The stab trim indicator is pegged out at full nose down and makes a sick clicking noise. I powered the whole thing down and contacted their support guy for further guidance.
Grrr.
What else? Purchased a used datalink unit from a real airliner for $30 after reading another article in the ProSim forum where the author repurposed the keyboard for controlling the sim, instead of using a keyboard.
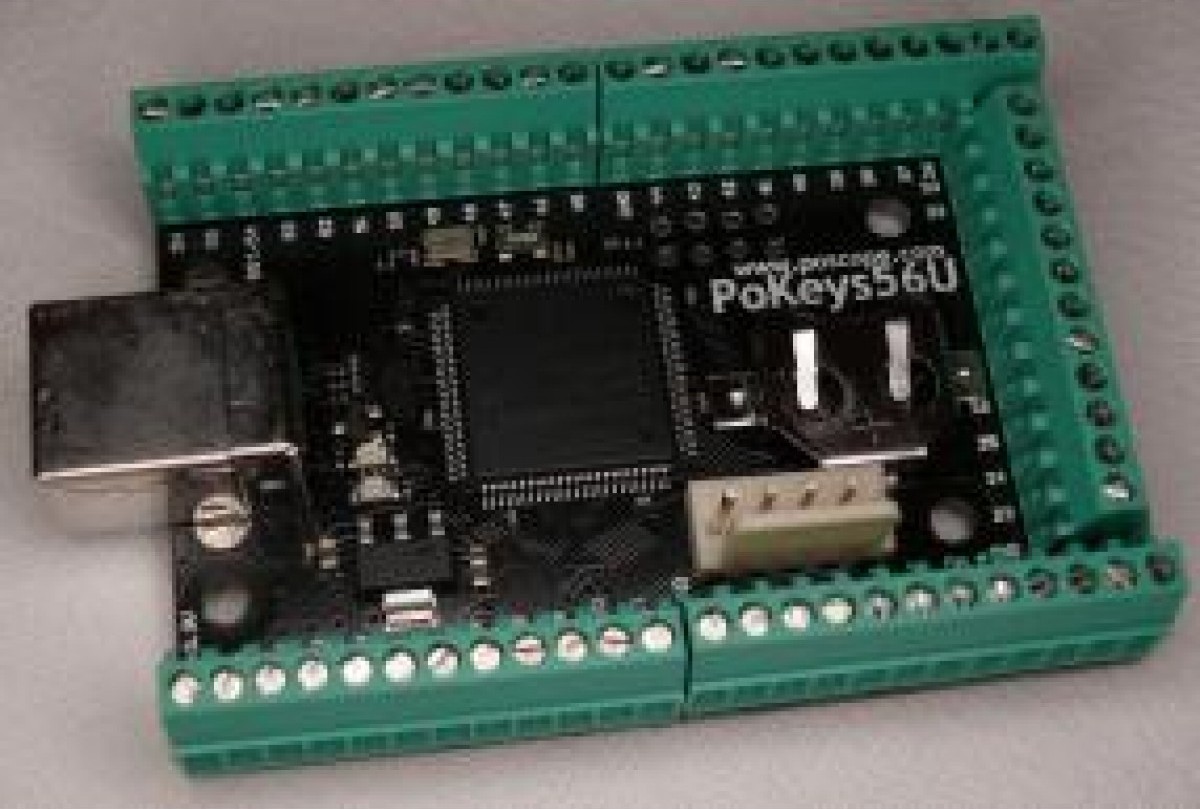
It will be mounted in the pedestal and I'll use it for controlling misc. sim settings using a Pokeys card
I ordered a couple of these little beauties, they seem quite capable in terms of trapping switch settings etc. and controlling actions in the sim. It can also control a 2 line LCD display - I may be able to utilize the one that's in the datalink to display METAR information, if not I can replace it with one that will. Or maybe I'll go with a printer option for full ACARS info. Check this link out! More on this as I build it out.