First check out of gauges was very positive. With everything plugged into the interface board, it all powered up and each unit went through its reset mode. The chronometer looks fantastic and functions well. The build quality of each unit is... fair to good. Sorry, but it's short of excellent. Here are my detailed observations (and it's not all down to Flight Illusions):
- When you look at the dimension specs on Flight Illusions web site, most of the depths are incorrectly stated. Not that it really matters if you're mounting things in an open backed frame but all the same.. If you can't publish the correct specs, how accurate will you be with the manufacture of the product. Case in point, the attitude indicator has a true depth of 50mm (not including the bezel) but a reported depth of 27mm
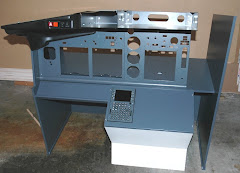
- The mounting holes are set 63mm apart on the big gauges. On the Engravity MIP, they're set at 79mm. No problem you think, I'll drill and tap new holes on the gauge. Not so fast, the gauge itself is about 83mm wide, leaving very little material to drill and tap into. Looking at forums, Engravity claims their hole spacing is per a real cockpit spec. In Flight Illusion's defense, they can't make a product that will fit any panel but you think there would be a bit more cooperation between the 2 biggest suppliers of Boeing simulator parts. As it turns out, the only 2 gauges that fit the predrilled holes in the MIP are the flap and yaw indicators
- The gauges arrived with no mounting screws. A review of forums indicates that Flight Illusions suggest you use "Parker" or self tapping screws. Into plastic? Scary prospect when you run the risk of ruining a gauge that can cost up to €278,30. Saying that, drilling and tapping isn't exactly worry free:
- For the gauges where the holes don't line up, I'll be using a strong double sided tape from 3M and will hope it's enough to keep the gear in place
- The yaw gauge was misdrilled in one corner. They cut it too close to the edge of the plastic case and the bolt is hanging out the side. Fortunately the other three bolts are holding it together
- Most of the plexi glass covers on the gauges were either dusty or needed cleaning. I used a can of compressed air to blow the dust out
- The attitude indicator is the most impressive piece of engineering. It has its flaws though. Instead of a slice off a sphere, they've used a piece of card bent over and stuck into a plastic holder, which you can see top and bottom (white plastic):
It might be a visual distraction or maybe I'm just being super picky
There were smudge marks on the printed card (ok, I am being picky, but try using latex gloves when you put these things together guys!):
Tried to mount the attitude indicator (tricky when you have to reach around over the top of the glareshield) and it wouldn't fit! Cause? Faulty cut out in the Engravity MIP panel. See the ridge in the bottom left at about 7 o'clock? We need to grind that out:
Gee what's with all the masking? Well, I don't want aluminum dust flying off all over the place gumming up the works and potentially shorting out expensive electronics:
Take note Anoraks, make sure all of the holes are ready to go before you assemble the MIP. You'll save yourself a lot of monkeying around later. With the hole smoothed out, I took a final look at the gauge before mounting it and decided that light will leak in from outside, ruining the effect. So a bit of gaffer tape applied carefully around the outside should make it light tight. Note the red double sided adhesive tape in the corners:
Now all of the gauges are installed (well where's the picture? Later my friends, I'll have another post for you this weekend), how does it look? It looks fantastic! Instead of the gaping holes in the MIP, it's looking very complete. However, all is not well.
Installed the Flight Illusions software and it recognizes the altimeter, chrono and attitude indicator. The test program ran them through their paces and they look stunning. It can't find the flaps, yaw or airspeed indicators. More analysis required and right now, the dog wants to go for a walk.
More later.


Hi Bill. You probably already have figured it out, but the answer to the issue of the Flight Illusion control board not recognizing some of the gauges installed is on page 3 of the manual...
ReplyDeleteBest.
Gianluca
Gianluca,
ReplyDeleteYup figured it out months ago. They work really well and I've had no problems with them at all.
Thanks,
FlyWJP