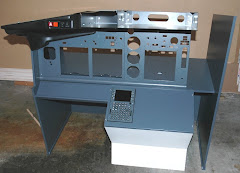
Also shown here is the Engravity CDU sitting in the forward panel. More on this later.
My intent is that this blog be somewhat instructional and educational, so to that end I feel it only fair to share my mistakes. Can you guess what caused this:
It's a piece of maple embedded in the drywall and is a result of kickback. Kickback is something that can happen when using power tools, in this case my table saw. I've used the saw for years and it's been about as long since I encountered the problem. What went wrong? Stupidity on my behalf. I needed a piece of blocking to go behind the light dimmer panel. Rather than cut a piece off using the chop saw, I found a piece of scrap lying around that had a beveled edge. "No problem, I'll just whip that through the table saw to cut it off". Since the piece was only about an inch and a half wide, I didn't have much of a grip on it, to hold it fast to the fence. It got loose from me, caught the top the blade and shot through the drywall. All that saved my pretty face (and the wife may argue it isn't that pretty to begin with) was my technique of always keeping my body to the side of the blade, instead of being directly behind it. Even then, I got lucky.
Moral of the story - if you're going to use power tools, read the manuals, use safety features, always be on your guard, adopt good practices, don't get complacent. A bit like real flying I suppose.
Still don't have the primary flight display screen in, so let's turn our attention to it. Now I know that the Acer 19" monitor I have is too high for the Engravity frame. A cut away panel is provided so you can drop the bottom of the screen through the MIP console:

You can just make out the little bits of metal you need to cut through. I'm using a small cut off tool to do the job. If you use snips there's a chance you will bend the thin aluminum.
Here it is with the cut away panel removed and the metal "sticks" ground down

With the frame screwed into the top and the forward panel bolted to the MIP console, it's an easy job to mark where we need to cut through. I need about 1.5 inches clear of the bottom - we'll see this in a later post.
What else is going on? I purchased another set of CH Products yoke and pedals on eBay (Bernd, are you reading this?), to tear down and incorporate into the sim. Will use them as a basis for a more realistic look and feel set, similar to Ian's efforts seen here. I got the gear from Bret in DC. He used them while practicing for a check ride in a real airplane. Nice chap even threw in a book on using flight simulators as a training aid.
All for now, other than I ordered a set of analog guages from Flight Illusions today (ouch!). Hopefully the lead time won't be 8 to 9 weeks....
Next up, I pull apart a working Acer 19" monitor to fit into the MIP.


No comments:
Post a Comment