Nor did another friend's question at the second party, what exciting thing did I plan to do for my 50th (also this year)? I was stumped. I wanted to say that I'll be treating myself to a Revolution Simproducts motorized throttle quadrant quickly realizing that to most outsiders, there would be nothing exciting about it at all. It really put a damper on the evening! I was struck with just what a boring tick I have become! I couldn't think of a single thing I wanted to do that would fit the general mould of "exciting" or life affirming. Race car driving? Done that. Hang gliding? Wife won't let me. Skydive? Possibly. Bungee jumping? Wouldn't mind the initial fall but not the bouncing up and down part.....
By Sunday morning I had figured it out. Will either take a real flying lesson in a real airplane (shock!) or a ride in this airship.
Back to work. I bought all the 2 X 4s and plywood for the base of the sim. Before constructing it, I decided to get the yoke mechanism working first. The plan is to mount it under the floor. I figured if I knew the exact dimensions of the yoke mechanism, I could build the rest of the base around it. My starting "plan" is a variation of the one Ian Sissons has posted. I liked his use of gas struts to give the yoke some feel and heft and found a pair from a woodwork supply store. Designed to keep cabinet doors open, they have the 100n oomph that Ian settled for in his 3rd generation design.
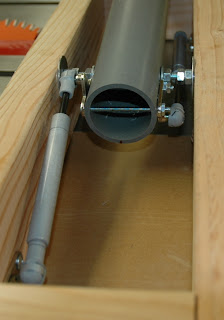
As for the upright, I'm using 2 inch electrical conduit. I'm guessing it has more strength than the drainpipe Ian used, as a consequence I can bolt components directly onto the pipe. Here it is:
The upright pivots on a bolt fulcrum. The gas struts offer the necessary resistance. They are bolted through the pipe, just below the fulcrum:
Here's a top down view showing the yoke column in the neutral position:
Now the neutral position is not 90 degrees, more like 82. In an attempt to get the rig to settle at this point, I moved the forward strut closer to center:
So that's it on the mechanical side. I must say it operates very smoothly and has a pleasing pressure to the way it operates - no idea how close it comes to the real thing but much more heft required than with the CH Products yoke. A lot smoother too.
Next up, I'll put limiters in to prevent the yoke from going all forward or all back (to prevent what you see in the above photo...), put a base on it and attach the electronics. It's finally time to pull apart Bret's yoke.


No comments:
Post a Comment