Monday, January 3, 2011

Happy New Yoke!

Since I was away from the workshop for a week or so, I got to thinking about the yoke design. You may recall from way back when that I was putting together a contraption using pulleys and a tensioned belt, ala this:
The problems with this approach are thus:
  • The springs you see there are to return the yoke to a neutral position. They pull down on the large pulley wheel making the tension adjustment on the drive belt a pain
  • The original idea was to use a smaller pulley wheel attached to the potentiometer. This would put stress on it due to the belt tension and would also result in the potentiometer "pegging out" prematurely at each end of travel
Without tools and materials to muck around with, I got to thinking about a different approach. To remove the tension issue, I decided to go with gears instead of the pulley wheels. When I was a lad this would be an easy affair, I'd dip into my Meccano set and pull out the appropriate sized gears and be done. In this day and age, Meccano has become something you turn to if you want to build a robot, race car or inter-galactic troop carrier. In short, they don't make the gears, sprockets, chains, bars and girders like they used to.

My extensive search for something similar lead me to a local hobby store where I picked up a small bag of gears etc. You can order it online here if you run into the same problems I did in finding something as rudimentary as a pair of matched gears!

Back at the workshop, I filled both sides of one of the large gears with epoxy. Why? Because I'll need to drill out a 1" hole for the spindle of the yoke to fit through. I then machined out the top to make sure the gear wouldn't turn when fitted it to the spindle.
You'll notice I made an index mark on the gear wheel - more on this later.
Next, I wanted to address a couple of issues in one go. In the original design, the back plate of the repurposed conduit box had a hole drilled through it to support the back of the spindle. This is fine but in addition I wanted something inside the box that would keep the spindle straight and would form the basis of a platform for the potentiometer. I turned to a piece of half inch thick polyethylene since it's easy to machine and is sturdy enough to provide support to the spindle.

In this photo you can see I drilled a 1 inch center hole to receive the spindle and also routed out about half the depth to one side to accept the potentiometer mounting board that I salvaged from the old CH Products yoke:

You'll also see that I've machined a small "window" so I can see the gear wheel position on the backside of the board. This next photo shows the reverse view:

Notice the 2 marks. They denote the travel limit of the potentiometer. When the yoke is in the neutral position, we want the potentiometer to also be between the two limits. I marked the gear teeth on the opposite (window facing) side so I can tell where to line up this gear with the one attached to the yoke spindle. What isn't shown here is a dollop of hot glue I stuck on the potentiometer shaft to ensure a solid bond with the gear wheel.

Next a dry fit of the parts:

In the little window cut out I can see that the gears are aligned and that the potentiometer is roughly at the midway point:

I then screwed the board in place from the outside of the conduit box.

Now the tricky part of pulling the springs down and hooking them onto the retaining bolt. Fortunately I have this little gizmo, used for installing the springs on recessed light fixtures:

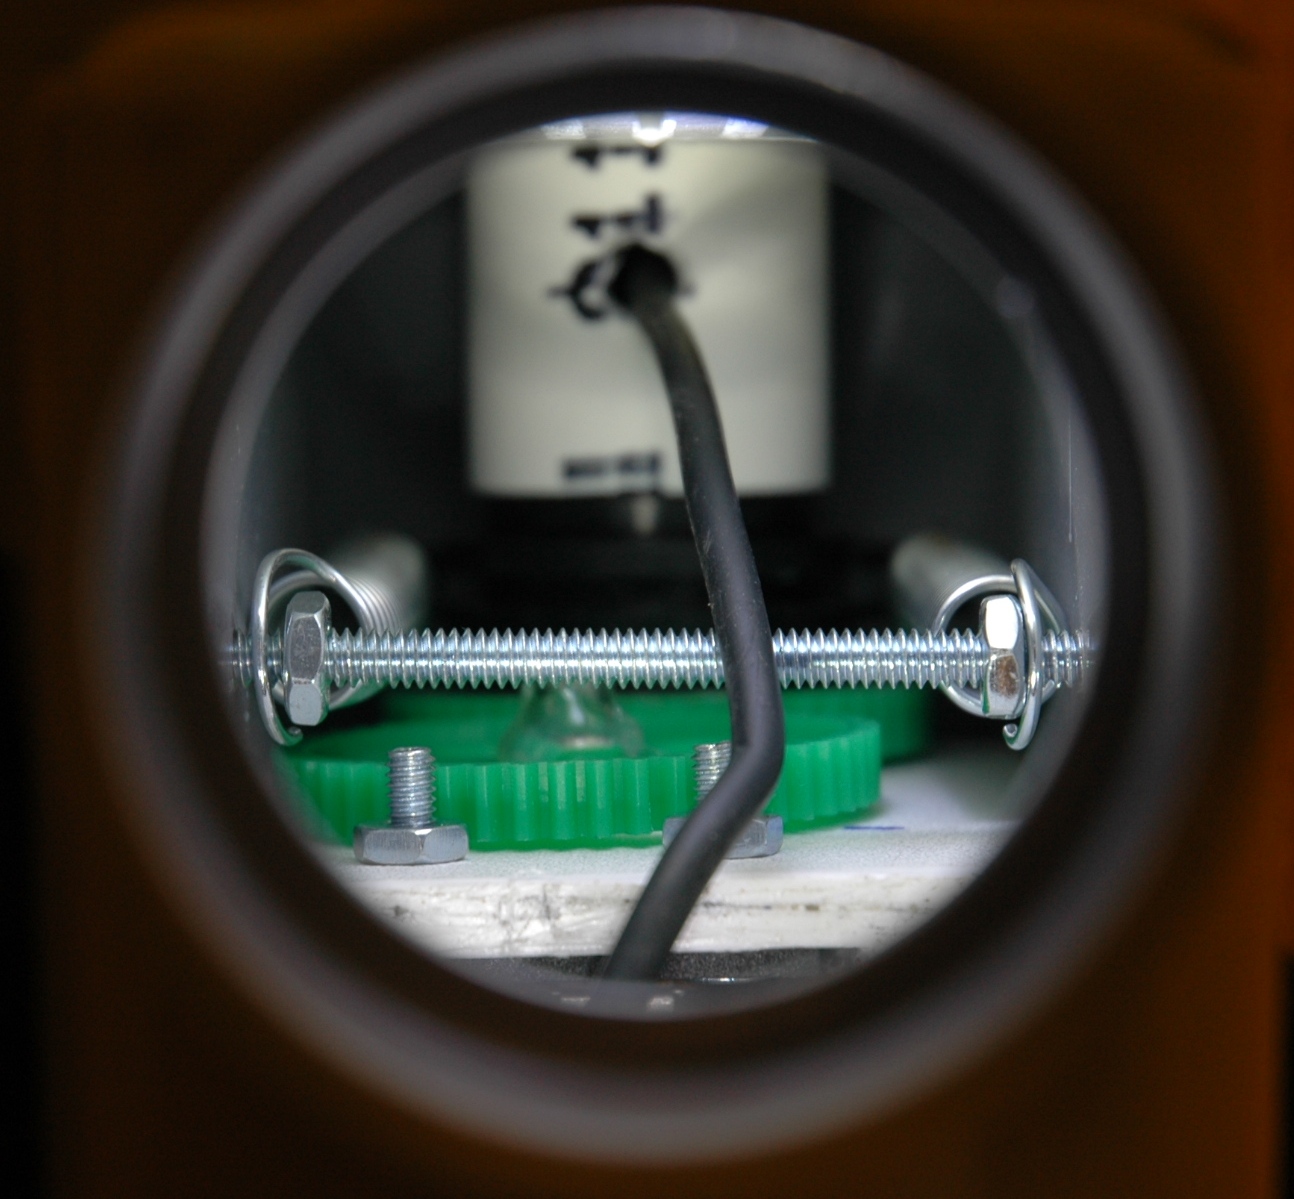
This next view is looking up from where the control column will attach to the yoke assembly. You can see the gears in place, the springs on the retaining bolt and the control wire from the yoke switches :
 And here it is, the (almost) finished article:
Well I never said it would look pretty... It's working, really smoothly too. So pleased I scrapped the first design and started over. Next I'll work on a redo of the column base, will get the pitch potentiometer sorted out and will get this thing plugged in for a test flight soon.

Other news to report - the snows in Paris have melted and the Fedex truck was able to make it to Revolution Simproducts factory. The replacement rudder pedal panels are on route. No word yet on when we'll get my TQ sorted out but hey - it's early in the year.

Wednesday, December 22, 2010

Bill of Materials

I decided to move this to its own post since it was getting difficult to manage

FSX and external visuals


 Project Magenta

Software 

Hardware

Revolution Simproducts - the sequel (part 4)

Did my homework over the weekend. What Oral from RS was hoping I'd report, is that the spoiler would deploy on landing. It didn't. Nor do the reverse thrusters work.

We scheduled another Skype session for Monday night my time... then again for Tuesday night my time. No progress to report. Seems that the new card in my TQ is functioning ok since we can calibrate the spoilers and see the other key depressions in the RS calibration software. Something is not getting through to Project Magenta and/or FSX. It could be the RS software that also needs to be running, alongside SIOC and FSX.

Oral is baffled and is going to regroup with the team in Paris before we try again. Just as well since the late nights and early mornings are killing me.

Oh and the rudder pedal panel replacements? They were supposed to ship on Monday. Received an email from RS, due to the snow they were having difficulty getting to work and the courier wasn't shipping anyway. Also saw a broader message go out to all customers awaiting shipments - a positive move. Much better to keep customers up to date with status rather than expecting the customer to enquire repeatedly. I look forward to an early thaw in Paris and a resumption of normal service.

Another sign that my feedback is being taken seriously is that RS would like to start using the "Remove Before Flight" sheet on future TQ shipments (see my post of December 13th). I also offered to rewrite parts of the TQ installation manual - must get that finished and back to the guys soon.

Now did I happen to mention my banging new computer? What a beauty! Got the memory cards installed last week and the beast started up first time without a hitch. First time I've built my own system and I'm surprised at how easy it was.

I've installed FSX on its own "solid state" disk drive. Software start up time is dramatically reduced and the scenery loading in flight is seamless. Would recommend this option for anyone who wants a quick performance increase with FSX without investing in a new computer.

As for the faster processor speed, I'm now enjoying almost 30 frames per second with all of the graphic sliders turned to high. Have yet to fine tune the settings (do I really need to see boats on the water? Nah!) or try my hand at over clocking the CPU. More on this later.

This will probably be my last post of the year (unless Oral gets back to me today). We've passed the 1 year mark on this blog - expect accelerated progress in 2011!

Thanks for following.

FlyWJP

Friday, December 17, 2010

Revolution Simproducts part trois - we have lift off! (almost)

Spent an hour or so via Skype with Oral today from RS. What a nice chap! Together we worked through the process of getting the TQ up and running. Here's a summary for you - could help alleviate some frustration that you may encounter:
  • To enable Oral to see what was going on (and to take control of my computer when needed) I installed a copy of CrossLoop
  • To get my headset working with Skype, I had to plug in a USB hub since I was out of open ports. This meant that the TQ had to be plugged in there too. When I opened up SIOC, I could see that it had lost sight of the IDX settings for the 2 motor cards. I quickly fixed that and corrected the .ini file
  • Oral checked the SIOC settings. All looked good. He was able to control the throttle levers and get them moving (first time I've seen them do that)
  • Moving the spoiler and flap levers, we couldn't see any action in SIOC. Oral guessed that my TQ had been fitted with a newer card and sure enough, this was the case
  • This required some additional software to be downloaded from RS. The good news is that the calibration setting for flaps and the spoiler are much easier in this new utility. The bad news is that the SIOC script had been written assuming that the old card was in my TQ
  • Oral made some on the fly script changes and we got the thing working
At last! The throttles move on their own, as controlled by the auto pilot! Trim wheels too!

Some other observations for you, now that I have a better idea of what is going on:
  • Oral pointed out that the reason I couldn't see the device appear as a "joystick" is that the port labeled such is to trap the button pushes only, not the axis of the throttle levers
  • The TQ needs to be plugged into the main computer in your set up
  • In my case, it talks to the Project Magenta MCP via FSUIPC. Since I didn't have it up and running in my previous tests, even with the correct RS software, nothing would have happened
  • Also in my case, the computer running the MCP is separate to my main computer. It talks to FSX via FSUIPC, passing the inputs from all the devices I've got hooked up to it. A bit like this:
  • In a previous posting I complained about Project Magenta "deleting itself" on install. When I tried to fire it up today, the executable was missing again! On a hunch I got from watching Norton bitch about the CrossLoop install, I checked the quarantine section. Lo and behold, my glass cockpit and MCP software was sitting there. PM isn't deleting itself, Norton is! I made the settings for Norton to ignore the executables, I'll keep an eye on it though
  • Startup procedure will  now be: FSX, Project Magenta, RS software, SIOC
  • Close down procedure (otherwise as Oral points out, your TQ motors may keep running): SIOC, RS software, Project Magenta, FSX
Since it was getting late (there is a 10 hours time difference between Oral and myself), I was assigned some homework: 1 landing with the speed break armed, another with the speed brake down and locked and the thrust reversers engaged. I'll get to it over the weekend. In a way it was a relief, I didn't want Oral looking over my shoulder, sniggering at my attempts to land.... not only once but twice!

Still to sort out, even though we could see the flap and spoiler levers move in SIOC (and calibrate in the RS software), it's not communicating with FSX. Nor the engine cutoff switches. Backlighting packed up too for some reason.

Parking brake works real good! I have the motorized one, meaning when you push on the brake pedals, the parking brake clicks off, just like in the real deal. It's the simple stuff that floats my boat.

What else? Check out my banging new computer!:
Those of you with eagle eyes will notice the memory cards are missing. Amazon reliably informs me that they're on the back of a UPS truck out for delivery. If so I'll get them in tonight and will fire some life into this bad boy. Eagle eyes will also notice I need to tidy up the wiring...

The plan is to reserve this system purely for FSX and for external visuals. Nothing else is going on it. Here's the spec sheet (most of which I cribbed from Ivar Hestnes) - all ordered from Amazon (at very good prices I might add):
That should do nicely.

Monday, December 13, 2010

Follow up to Revolution Simproducts

A brief post to bring you up to speed with weekend activities. A flurry of emails between myself and RS - I appreciate the guys being so responsive over the weekend. In a nutshell:
  • The rudder pedal kit design did change around the end of October. Ian wasn't aware (he is now!) and will be working on a new video
  • The shipper at RS sent me the wrong panels - they will be replaced. The new design does not include the inner panels, just the outer ones
  • The side pieces you connect the panels too have changed and are now a single piece that attaches to the base
  • The cover doesn't go all the way to the back of the pedal base. This is to allow the interlink mechanism for 2 pedal sets to connect up and not bind
  • Eren will send a photo on how to connect up the potentiometer cables to the control board
On the TQ side:
  • Oral generally works with each client to set up a SIOC script. He asked me for some key information (serial # of my TQ, version of FS, PM or PMDG) and will get back to me
  • He also offered "a sleepless night" session via Skype,  to work with me on the set up. I thought this was very kind (he is after all 10 hours ahead of me)
My suggestion to RS is this: why not print on a single piece of paper which you tape to the TQ that covers:
  • What you shouldn't do once you have unpacked the TQ (eg. Pull the reverse levers back unless the engine cut out switches are set to idle)
  • Procedure for capturing key information that RS will need to set up your SIOC script
  • A pointer back to the RS website for the SIOC install download
Maybe something like this (feel free to use it guys):

A little customer service goes a long way.

Saturday, December 11, 2010

Revolution Simproducts rudder pedal "kit"

Oh oh, you know it's not going to be a good post....

Started in on the pedal kit today. Since the package arrived with no instructions whatsoever, I watched Ian Sisson's excellent instructional videos on how to put the thing together. Now let me qualify my observations here, it's possible that the RS team changed the design of the kit after Ian produced the videos (I have an email into Eren to give him the benefit of the doubt). Here's what I noted where the video differed from what I tried to put together today:
  • Footrests were not pre-assembled (no big deal, the screws were in the box and it was easy to do it myself)
  • Parts were not numbered
  • Inside side panels were missing or have been redesigned. A couple of white plastic pieces were in the box that look like they are designed to connect the top and bottom side panels together:
  • 
  • However, there is nothing to connect the rear of the panels together
  • The locking nuts for the rudder pedal brake spring bolt are missing

  • The base side pieces that Ian mentions look like they have been replaced with a single plastic piece as shown below:

  • Also the brake pedal gears were not indexed – I put that mark in there myself. I presume the potentiometer should be midway between stops when the pedal is in a neutral position
  • The top side panels already have a plastic lip screwed to them. In Ian's video there is a single piece of plastic that joins the 2 sides together
  • In my “dry fit” I can see that the side panels don’t go all the way to the rear of the unit. Have asked if this is "as designed"
  • There are no instructions on how to wire up the pedals to the tiny control board - guess you're on your own there bub (although there is an online guide on how to calibrate it in FSUIPC)
  • As previously reported, the paint work on the side panels is in a shocking state:
Anything I do like for my 999 Euro? The mechanics of the pedals are sound, move smoothly and have a real heft to them. The foot rests look cool too. Was it worth it? No, I don't think so

Friday, December 10, 2010

Le TQ est Arrivé

Finally, here it is! Arrived Monday. And what a beauty. The build quality is superb, the thing looks stunning and feels solid - no photo can do the experience justice:
Some comments:
  • The packaging was adequate to get the thing here without any breakage - well done there (although it came in a cardboard box, not the wooden crate they talk about on the website...)
  • Have a shop vac handy though - they used a low cost expanded polystyrene material that disintegrates as soon as you touch it. The bits go everywhere. Fortunately the TQ was packed in a bin bag (trash can liner for you Americans) and kept the debris away from the moving parts. I vacuumed it down before opening it up
  • The TQ doesn't fit the center console. I'll need to either build a new one or put some new sides on the TQ. Either I got the angle wrong on the console or RS did...
  • With time free Friday night, I started to set it up. Downloaded the SIOC software and followed these instructions. Seems like I need a personalized script which did not ship with the TQ. Read elsewhere on the RS website that I should have a Skype session with the RS team to fine tune the settings. I know they don't work weekends, will need to get it going next week
  • The SIOC software reported one of the device IDs as being "*". Tried putting this in the .ini file, SIOC then tells me it's not an integer and just clams up
  • There are 2 install guides on the RS website. One is for Project Magenta, the other is for PMDG. Best I can tell, they are identical and both refer to PMDG. No use to me since I'm running Project Magenta...
That's a bother - no chance of getting it going this weekend. Rats.

Also in my shipment, the rudder pedal kit. Looks good except for the painted panels. I think they were put in the aforementioned bin bags while the paint was still wet:
In the second photo you can see where the ink from the bin bag transferred itself over to the wet paint. You can also see where some of the paint simply flaked off. An email to Eren and he informs that a fresh set of panels is on the way. Doubt I'll have it by Christmas...


My tale of shipping delays hit a chord with one of my readers - received an email from Raik saying that his experience is very similar. Still no sign of his TQ and his emails to RS are going unanswered. Was supposed to ship in November...


Over the weekend I'll get the pedals hooked up. Will let you know how that goes.


But hey! There's more! Amazon has started shipping the parts for my new sim computer. The chassis, power supply, disk drives, CPU and display card have arrived. Motherboard is on route - just waiting on the memory to get the whole thing rocking and rolling.