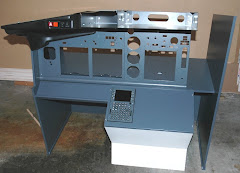
Some pics of the pedestal build out for you. Here it is during a dry fit with the TQ etc:
The ah, Captain's chair you see there is temporary - trust me. The case is made of MDF (Medium Density Fiberboard), devil to work with but sands really smooth and is stable. The units are sitting on aluminum angle brackets that are screwed and epoxy glued into the side and on the 2 center supports. I covered the rails with masking tape, set the units down on top and marked where the holes should be drilled:
And here's where you see my cock up. My brainwave was to cut 2 dados in the back and front to slide the center supports into. The idea being that this would ensure they would be perfectly parallel to each other and that I could easily adjust the height of the supports to have all rails be nice and level. As you can see, I put the dados in on the wrong side of the mark I made. Doh! Hence the added strip of MDF nailed to the top of the sliders. Once it's covered up you'll never see it, I was cross with myself anyway and too lazy to redo the end pieces.
You'll also notice the bit of metal I have on the back, where the fire handles go and the whole thing backs up to the TQ. It's from an old laserdisc player that had seen better days. It also has this cool sticker on the back which I of course saved (what an anorak!):
I made a small rabbet to keep the whole thing flush. Another construction photo for you that simply shows how the sides of the case are nailed to support members inside:
All the nail holes and small gaps have been filled with Bondo. Now a word about drilling the holes for the mounting screws. Even with a hefty drill press and being as accurate as I could be, the tolerances on these units from CPFlight are very tight. The supplied bolts are about the same size as the holes in the units themselves. In my final dry fit before painting, I can see that the drilled and tapped holes in the aluminum strip don't always quite match up with the holes in the units, like this:
The solution is for me to drill bigger holes in the some of the CPFlight units, not something I'm thrilled about of course. Note to CPFlight, make the holes bigger so we don't have to.
Wife heads out today for a 10 day business trip in Europe - I'll be putting more hours in on the sim. Next up, paint the pedestal and get the base finished.
Subscribe to:
Post Comments (Atom)


Beautiful work! I like it. My center pedestal is from Opencockpits. You did well in building your own. Mine is not as nice as yours! Bravo.
ReplyDeleteGianluca
said....Beautiful work, too. Very nice work i see!
ReplyDeleteWeiter so!!!
Greats Patrick
http://737ng-info.blogspot.com/
Thanks guys! My day job got in the way of progress lately but I hope to get the metal trim and paint on this weekend. Will post with an update Monday.
ReplyDeleteFantastic work. I totally agree with you about MDF it's a real pain to work with (and can be dangerous to - it's carcinogenic!!!) but it's a great material to work with. I've used it a lot in my own project beacuse it's so easy to cut and sand. Keep up the great work.
ReplyDeleteRhydian