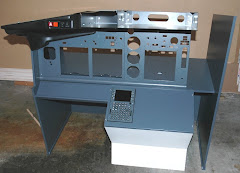
My goal is to make the trim out of one piece of 2 inch aluminum bar, 1/8 inch thick with 2 X 90 degree bends and some fancy cut work. Since I could only find an eight foot length, I had some spare to waste in experiments. My aim here is to make 2 perfect 90 degree angles with no distortion to the bar. In other words, all sides have to be straight and flat after putting the bends in.
First test was to put a piece in the small bench vice I have, then bend it manually. The result wasn't that impressive:
The radius is too much and the side that wasn't in the vice has lost its straightness. To reduce the radius, I knew I'd need to remove some material. At this point, if he's reading this I'd advise my mate Nick (a master craftsman) to skip down to the end - he'll be horrified to see what I'm about to share with you...
My tool of choice to remove the material is a router with a carbide bit. The aluminum is a softer metal, the carbide should be able to cut through it ok. What I didn't want to do was make a deep cut in one go. To facilitate multiple shallow cuts, I built a simple jig. It's a bit of scrap wood where I've dadoed out a grove that is the exact width and depth of the aluminum bar, as shown here with the bar in place:
Running perpendicular to the wood, I've screwed in a couple of scrap bits of plastic, to act as a guide for the router:
Making a number of shallow cuts, I cut through about three quarters of the stock. When finished I simply bent the bar in 2 by hand. Result, a perfect 90 degree angle that lasted for all of 10 seconds. I flexed the thing back a little (since I'd gone further than 90 degrees) and it fell apart in my hands:
I'd cut too much out. A second attempt using a shallower cut (about half way down) and bending it in the vice resulted in a more sturdy, perfect 90 degree angle.
Saturday arrived and it was pouring down with rain. Great I thought, a full uninterrupted day in the workshop! "Not so fast" spoke the missus. It's time for that other great indoor sport that Americans enjoy at this time of year, yes you guessed it, prepare the tax return... Well if nothing else it gave me the incentive to get it done and out the way, since the next thing I was obsessing about was how to make the narrowed end of the trim.
The trim is a full 2 inches at the rear but at the front it goes down to 1 inch for about 7 inches in length. I want the thinner end to be as parallel as the thicker. My cutting tool options are limited. I opted for a jigsaw with a metal cutting blade. To stop the aluminum bar from flapping around, I screwed it down onto a scrap piece of 3/4 inch plywood. To make a parallel cut, I screwed in a fence guide for the jigsaw to push up against:
I then clamped the ensemble to the end of my workbench. Here's a shot with the jigsaw in action:
Result, a perfect straight line.
As for the angled cut, I just eyeballed it and cut it freehand:
Back to the cabinet, I cut a dado all the way around the top to accommodate the metal trim. My goal is to have the trim run flush with the sides of the cabinet. Here's what it looks like:
A dry fit with the bar shows the challenge ahead - how to get the 2 X 90 degree bends in and still keep the whole thing flush to the sides:
I marked where the first bend was going in and made the cuts with the router:
Ok Nick, you can start reading again...
Now to make the first bend. I wrapped the jaws of the vice with thick pipe tape to prevent the surface of the aluminum bar from being marred. I then placed the bar in the vice vertically and clamped a piece of scrap to the end of the bar I will be bending. The pre-bend ensemble looks like this:
Here's what it looked like after pulling down on the wood/bar combo - not bad at all:
I put it back on the cabinet for another dry fit. Looking good. I made the mark for the second bend and started worrying. What if my mark is off by a fraction? Metal is a lot more unforgiving than wood. If I cuff up the second bend, it's back to the hardware store and start all over again on the fabrication. To hell with it - second bend went as smooth as the first.
Result? It fit perfectly! Oh you can believe there was some celebration tonight - rarlely does anything come together so well but my goodness it did. Next, I used a 220 grit fine sander to work out all of the saw cut marks and rounded off the cut edges. Screwed it in place and chopped off the over cuts. How does it look? Like this:
Ready for a little more filling, primer and paint. Now though, sleep. A sleep where I won't be waking up through the night panicking about those bends....


No comments:
Post a Comment