Sunday, April 25, 2010

Much better, less grumpy

After a spot of RTFM with the Flight Illusion manual, I learned that the chrono, attitude indicator and altimeter come with a preset device ID. The others are generic gauges and have the same ID until you change it (but of course! How did I miss that?). Since the flap, yaw and airspeed indicators are generic, you need to hook them up one at a time and let the config program find them. From there you can reset the device ID to ensure that they are all unique.

Bottom line, all of the gauges now function. And they do so flawlessly. Without any further set up or calibration, first tests are showing very promising. And here's how it all looks:
..with the exception of the engine screen which I don't have hooked up to a computer at the moment. What a delight to see at a glance the current flap settings and to see the indicator move at the speed of flap extension! Outstanding! Ah it's the little things that bring such joy to Anoroks such as your truly.

Alrighty then, must press on with the yoke and platform, this weekend's work has added fresh vigor.

Saturday, April 24, 2010

I can see clearly now the ash clouds are gone

What a difference a couple of days makes? Sister and kids got home, Flight Illusions gauges arrived!

First check out of gauges was very positive. With everything plugged into the interface board, it all powered up and each unit went through its reset mode. The chronometer looks fantastic and functions well. The build quality of each unit is... fair to good. Sorry, but it's short of excellent. Here are my detailed observations (and it's not all down to Flight Illusions):
  • When you look at the dimension specs on Flight Illusions web site, most of the depths are incorrectly stated. Not that it really matters if you're mounting things in an open backed frame but all the same.. If you can't publish the correct specs, how accurate will you be with the manufacture of the product. Case in point, the attitude indicator has a true depth of 50mm (not including the bezel) but a reported depth of 27mm
  • The mounting holes are set 63mm apart on the big gauges. On the Engravity MIP, they're set at 79mm. No problem you think, I'll drill and tap new holes on the gauge. Not so fast, the gauge itself is about 83mm wide, leaving very little material to drill and tap into. Looking at forums, Engravity claims their hole spacing is per a real cockpit spec. In Flight Illusion's defense, they can't make a product that will fit any panel but you think there would be a bit more cooperation between the 2 biggest suppliers of Boeing simulator parts. As it turns out, the only 2 gauges that fit the predrilled holes in the MIP are the flap and yaw indicators
  • The gauges arrived with no mounting screws. A review of forums indicates that Flight Illusions suggest you use "Parker" or self tapping screws. Into plastic? Scary prospect when you run the risk of ruining a gauge that can cost up to €278,30. Saying that, drilling and tapping isn't exactly worry free:
  • For the gauges where the holes don't line up, I'll be using a strong double sided tape from 3M and will hope it's enough to keep the gear in place
  • The yaw gauge was misdrilled in one corner. They cut it too close to the edge of the plastic case and the bolt is hanging out the side. Fortunately the other three bolts are holding it together
  • Most of the plexi glass covers on the gauges were either dusty or needed cleaning. I used a can of compressed air to blow the dust out
  • The attitude indicator is the most impressive piece of engineering. It has its flaws though. Instead of a slice off a sphere, they've used a piece of card bent over and stuck into a plastic holder, which you can see top and bottom (white plastic):

  • It might be a visual distraction or maybe I'm just being super picky

  • There were smudge marks on the printed card (ok, I am being picky, but try using latex gloves when you put these things together guys!):

  • Tried to mount the attitude indicator (tricky when you have to reach around over the top of the glareshield) and it wouldn't fit! Cause? Faulty cut out in the Engravity MIP panel. See the ridge in the bottom left at about 7 o'clock? We need to grind that out:

  • Gee what's with all the masking? Well, I don't want aluminum dust flying off all over the place gumming up the works and potentially shorting out expensive electronics:

  • Take note Anoraks, make sure all of the holes are ready to go before you assemble the MIP. You'll save yourself a lot of monkeying around later. With the hole smoothed out, I took a final look at the gauge before mounting it and decided that light will leak in from outside, ruining the effect. So a bit of gaffer tape applied carefully around the outside should make it light tight. Note the red double sided adhesive tape in the corners:
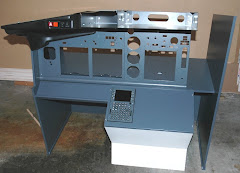
Now all of the gauges are installed (well where's the picture? Later my friends, I'll have another post for you this weekend), how does it look? It looks fantastic! Instead of the gaping holes in the MIP, it's looking very complete. However, all is not well.

Installed the Flight Illusions software and it recognizes the altimeter, chrono and attitude indicator. The test program ran them through their paces and they look stunning. It can't find the flaps, yaw or airspeed indicators. More analysis required and right now, the dog wants to go for a walk.

More later.

Tuesday, April 20, 2010

Volcanic Ash Cloud Grounds Sim...

Grrr! Flight Illusions "mailed" the gauges - only problem is, DHL isn't flying..

On the bright side, my business trip got cancelled! Whey hey! Bad news, my sister is stuck in Boston with 3 kids trying to get back to England. Boo!

Have made some slow progress on the yoke. First step was to secure the control wheel to the yoke head housing. I did this with the afore documented wooden bung, added a PVC spacer made out of irrigation pipe (that's the white bit in the photo), added the arm previously drilled for the tensioning springs, drilled a new hole in the top of the tube for the fixing plug (it secures the arm to the rod) and a one in the bottom to pass through the wire from the control handle. End result is this:
Forgot to mention, before I put it all together I applied a liberal amount of grease between the control wheel and the wooden bung... Inserted the assembly into the control head and slotted a pulley onto the rod. It's a good friction fit but note the notch I cut into the pulley so that it fits over the fixing plug. This way the pulley can't slip when the rod rotates:

So the plan is to fix the roll potentiometer to the housing and run the belt around it and the big pulley. Will work on that later this week and will report on results. In the base of the yoke, I have the elevator potentiometer in a test set up, will affix it later and let you know how it works.

And can you believe it's raining again in San Francisco?

Tuesday, April 13, 2010

Yahoo! Flight Illusion gauges will be sent "this weekend"...

Well, just got an update from Flight Illusions today. They plan to get my gauges in the mail by the weekend. Rocking good news. I'll finally be able to plug up most of the holes in the MIP. Sadly though, more business travel ahoy. So expect further delays to the blog updates. I really feel like I'm letting you all down, whereas in reality, I know you probably couldn't give a stuff.

Will really, really try to get my head down and make some progress on the build this weekend.

Monday, April 5, 2010

Non sim building thoughts and reports

Dear reader,
As you know, I've been out of pocket for a couple of weeks, resulting in zero activity on the build. I did get to fly in real life though and thought I'd share my thoughts on it, in the absence of anything build related. If you're not interested, feel free to tune in later in the week when I should have something on topic to share...

My trip was to Europe, partly business and partly to see family and friends. The direct routes from San Francisco invariably take you over northern Canada, Greenland, Iceland then down over England to the mainland. My option is always for a window seat on the left hand side of the plane. Three reasons:
  1. I don't want some jackass pushing past me every hour or so wanting to go to the bathroom
  2. I am that jackass that will push past you in the middle and aisle seat....
  3. At this time of year you stand an excellent chance of seeing the northern lights
On point 3, I wasn't disappointed. While the other dullards were watching an edited version of a movie on a tiny screen, with lousy sound quality (the same video you can rent or buy in the next 6 weeks), I had my head glued to the window after sunset, waiting for the light show. Sorry, no photos. Even if I had tried it wouldn't have done it justice - it's something you need to experience yourself. To get an idea of what I'm talking about though, here's a ground based photo from Senior Airman Joshua Strang:


Of course it's not a moving picture. When you see the northern lights they are constantly "moving" and changing. To see something of this scale appear to ripple across the viewable horizon is breath taking. On this occasion it was very bright and at times had more color to it than I've seen before. Have yet to see it from the ground but can fully recommend watching it from the comfort of your window seat.

Flying back from Europe, I always try to get a seat on the right hand side of the plane. You will miss the views of the Golden Gate bridge (assuming a Golden Gate 5 arrival) but what you will stand a better chance of seeing are spectacular views of Iceland and Greenland. Like these:


A pet peeve is having to fly economy. Not so much because I have to disturb and trip over my fellow passengers every hour on the hour, more because I often get stuck in front of someone who is determined to massage my kidneys with their knees. No better example than on the flight home this weekend. A "gentleman" sporting a Fresno State polo short (yes, you know who you are..) spent most of the 11 hours banging into the back of my chair then apologizing repeatedly and profusely every time I gave him the hairy eyeball. Now I'm a good person to be sitting behind since I rarely recline my seat. Mr. Knees behind me didn't take that into account.

So here's my other flying tip for when the knees get to be too much: go stand near the galley and scrounge whatever you can from the attendants. Don't return to your seat until you are sure the people in the aisle and middle seat have finally fallen asleep.

Also of note, while in Germany I visited the Speyer Technik Museum. They have a 747 up on 40 feet high stilts. Check out the web page and you'll see that the thing is banked over to give the impression of flight. You access it by an external staircase. 2 things struck me: when you step into the 'plane you are immediately disoriented because the thing isn't level. A bit like being seasick. The second was just how "dangerous" the thing is in places!

You can access the cargo hold via a steep ladder. Once you're down there, you need to step over the 3 foot high bulwarks, all apparently designed to snap your legs off at the knees! Now of course to we anoraks this is no problem but in the US it would represent a liability issue that the lawyers would cry verboten and that would be the end of it. So hats of to the Germans for not appearing to give a hoot about your safety. Oh the other thing you can do is walk out onto the wing at look back at the fuselage (don't worry, there are handrails). Excellent viewpoint to give you a different appreciation for the size of the sucker.

The other highlight at the museum is the Russian Buran shuttle. The thing even had jet engines...

Many thanks to all the friends and family that put me up last week. Special thanks to my big sis and bro in law. They are spreading the word of this blog to anyone with a passing interest in others with obsessive/compulsive disorders, such as mine. Couldn't help but notice the scrap of paper on the dining room table with this URL scribbled on it...