Friday, December 25, 2009

Ho ho ho! Merry Simmas!

Well then, not only were Santa and his Elves cranking away on the workshop overtime, your favorite red nosed Anorak was hammering away too.

Made a couple of design decisions before applying the paint to the MIP stand. Worries that all of the movement around the shop would break the fragile fiber board, I added some hardwood feet:


Also decided to knock out the forward console. It houses the CDU and an additional EICAS screen. I won't be bothering with the EICAS for now, although I really want to get my CDU working. Mine is a plug and play unit from Engravity.


See those tricky angles at the front? That's a 135 degree kink near the bottom. To get the miters just right I used (for the first time) a digital angle guide on my table saw. Boy did that save me some time! Need to half that 135 degree angle? No problem sir, 67.5 degrees coming up:


I couldn't resist - bolted the MIP pieces to the stand and put the seat in front to check the ergonomics (what little there are at this stage):


All felt pretty darned good! Next up - I'll cut a hole in the MIP and forward consoles to fit a 19" Acer screen. It will provide the visuals for the Primary Flight Display (PFD) and the Navigation Display (ND). Then I'll get some paint on, lug the whole thing up to my guest bedroom, rig up some of the wiring and fly the sucker - it's been too long since I took to the "air".

Monday, December 14, 2009

Progress!

A rainy weekend in San Francisco meant I was able to get 2 coats of primer on the dining room walls...

"What was that?", I hear across the internet, "I thought this was a Blog on building a sim?".

Indeed it is, and there was some of that going on too this weekend. Since we decided to stay home for Christmas (more time for the sim - whay hey!), there's a good chance we'll have people over for dinner. So fair's fair - I split my time between building the MIP console and doing the domestic work.

So here's the MIP stand, made out of half inch fiber board:


Fiber board is the material of choice, it would seem, for most builders. I find it a pain to work with. I have a well equipped workshop, so there's no excuse there. The problem with the board is that although it paints well, it doesn't really lend itself to structural work. It's easily broken and doesn't take a screw well.

I don't take a photo well either - here's a close up of a crack in the edge of the board caused by screwing in the side panel:


Sorry, didn't realize it was out of focus until I had filled the crack.

Other problem I had was that I tried to get cute. I cut a half inch dado in the side panels to receive the shelf. I thought this would add some structural stability but instead was a nuisance in bedding the shelf in, even after I had eased over the shelf edges. Anyway, got it in there, glued screwed and nailed the sucker in. Also put in a rear panel to provide more support.

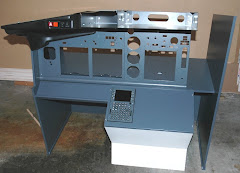
So here's how it looks with the MIP in place:


You'll notice that there's a gap on the right hand side. This is because the bracket that holds the MCP and EFIS units is built for a full size cockpit (one that has a first officer station). Since I may add the other side to the cockpit at a later date, I didn't want to cut down the size of the bracket. This is why the right hand side of the console doesn't match the profile of the left:


Later I'll add a piece of metal that will connect the right hand side of the bracket to the console. Not sure what I'll use the space to the right of the center panel for, possibly storage for manuals.

Next up, prime and paint on the console, finish coat on the dining room walls...

Wednesday, December 9, 2009

What will the new cockpit look like?

Phase 1 will concentrate on the MIP - Main Instrument Panel. I'm handy with woodworking tools and still have all of my fingers. I could build my own MIP from medium density fiberboard, fill, prime and paint it. Looking at other's efforts and once again reading about Vidar's attempts to build an overhead panel, I decided to go high end: Fly Engravity. It will save me a lot of time and will provide the level of realism I'm looking for.

Now I live in the US. Most flight sim vendors are in Europe. I'm sure most of us Americans have some trepidation about buying this stuff on line, especially at the prices they're asking and with the dollar exchange rate as it is. I think you can learn a lot about a vendor's commitment to their customers by checking out their support forums and by reading other enthusiast's accounts of service. My dealings with Engravity have been nothing short of 100% positive. You have no need to worry about them.

I opted for the desktop MIP, captain's side and center console. Also purchased from Engravity the CP Flight MCP (autopilot controller) and EFIS. These units are of exceptional quality, look and feel. Sorry Go Flight, but when I compared the operation of my new units with theirs, it's a quantum leap in quality, realism, and operation. It even has an electronically operated auto throttle disconnect. All tests so far have been flawless.

As for the software, yes I went with Project Magenta. So pleased I did although again not a purchase to be made lightly. So what else is out there that comes close? I did purchase some software from Ellie Avionics. It comes close to Project Magenta but has some pros and cons for you to consider:

Pros
  • Similar to Project Magenta, it utilizes FSUIPC to network multiple computers together. Why is this important? FSX puts tremendous stress on your computer's processing power. If you can off load some of the demands (for example, the cockpit instrument panel display) to another computer, you can greatly increase performance of the external visuals in FSX. Ellie Avionics provides this capability - you can use a secondary computer for the primary flight display and the navigation display
  • They will eventually ship (although it seems like they've been in beta forever) an EICAS display. This provides status on engines, hydraulics etc.
Cons
  • Flight planning. It doesn't recognize the flight plan within FSX so you need to build your own. This requires separate software that you need to buy and I found it to be a pain. Plus there is no obvious way to share this flight plan across networked computers, unlike Project Magenta...
  • Limited (really I should say no apparent) support from hardware vendors
  • Did I mention their EICAS display is in Beta? I signed up for an offer they had, buy the standby gauges and get the EICAS free when available. I'm still waiting and there is no indication of when or if it will be released. Their web site says "fall 2009" but the pictures posted are from February. So with only 12 days of fall left - I'm not holding my breath
All pilots spend a lot of time sitting on their backsides looking at the instruments. Why should I be any different? I've seen some great efforts at home built captain's chairs. I don't have the time and in the interests of "keeping it real" opted for a used Weber seat from our friend Nick Louis. I'll post a photo once I can be bothered to take one.

We did have a couple of little slip ups with the seat and I'll spare Nick by not sharing the details. He did though thoroughly understand my situation and kindly made it up to me by shipping some replacement parts at no charge. Thanks Nick, you are indeed a gentleman of the first order.

The seat is in good condition and came with the inertial reel shoulder harnesses and 4 point release (you can imagine that got a laugh out of the wife when I tried it on for the first time). For weeks later I obsessed about how I would attach the seat to the base of the sim. In a real 737 the seat is mounted on J-rails to move it back and to the side. I have a plan for fabricating a set (Nick couldn't provide them and thinks I'm possibly nuts for trying to make some), details of their development will appear in a future post.

How obsessed on the J-rails? I can't find drawings or dimensions for them anywhere. A friend of mine's brother flies for Southwest. I left a rambling voicemail on the poor captain's cell phone, asking if he could take a tape measure to the cockpit seat and rails. He did leave a message for me - I'm just too embarrassed to call back...

Finally, I need a base for the MIP to stand on. It's semi finished in the workshop beneath my feet. Drawn up partly from plans I stole from our man in Belgium. Photos in due course - I've got to stop blogging and actually build something...

Next up - construction of the MIP

You meet the nicest people in the flight sim community

In my quest to find a combination of software and hardware that will work reliably, I've discovered a number of truths:
  • The flight sim community is a small one but it is very supportive
  • Most of the things you are trying to do, others have tried too
  • You need to buy more software...
In this post though, I'd like to focus on my fellow anoraks who have helped me along in the process. The first is Lefteris Kalamaras. He heads up Flight Sim Labs. They are an add on vendor who provided me (well not just me, anyone that wants to buy it really..) with some software that got my Go Flight EFIS unit working, albeit with PMDG's 747-400X Queen of the Skies

"Whoa!" I hear you cry, "I thought you were building a 737?". True. I've got a problem with the PMDG crew, I'll save that for another post.

Right now though we're talking about Lefteris. Only had a couple of email exchanges with him but I found him to be a real gentleman. My day job is in the software industry so I know all about not committing the features of your product by certain release dates. Lefteris though assured me that "soon" means within my natural life expectancy, unlike those creeps over in PMDG whose definition of "coming soon" is so vague you must wonder if they mean within this millennium (another post, another post...Grrrrr!). Lefteris was also gracious in his response to my forum posting on how to get started, which you can read in my post earlier today, if you're interested...

Next up is someone who probably has no idea how much time, effort and frustration he saved me. The man is Vidar Fagerjord. How did he help? Well, the big name in flight sim add ons for serious sim builders is Project Magenta. Their software is the standard that all others are measured by. Problem is, it's very expensive. So before I went down that path, I wanted to make sure that PIC737 would work with it. The insight that Vidar provided that I'd failed to figure out for myself you don't need an add on aircraft for Project Magenta to work! It will quite happily work with the default 737 in FSX and augments it's crappy systems with a full featured, networkable solution.

Now we'll save the run down on Project Magenta for another post. For now though I want to thank Vidar for his help. He put me on the right path and made clear that you get what you pay for with Project Magenta (they owe him a commission). By the way, Vidar is very active in a number of flight sim forums - I'm sure you'll run into him along the way.

There are some flight sim builders out there who are an inspiration. I mentioned Robert Vandenberghe earlier today. The real artists though are people like Alain Tremblay, this chap from Belgium (sorry, can't find his name), Nic D'Alessandro and Ian Sissons (BTW Ian, any chance you can give me those measurements I asked for?). I steal liberally from their websites, as you will see with my build out...

Next on deck is retired United Captain and chairman of the Airline Pilot's Historical Society, Mr. Nick Louis. We'll talk more about my dealings with Nick later. In the meanwhile you need to know that he:
  • Provides decommissioned real aircraft parts for sim enthusiasts to incorporate in their cockpits
  • In his own words donates "generously, and regularly to children's hospitals, homeless shelters that specialize in families with children and other important entities of that type….Your support through purchases or donations is required, and I am not ashamed to ask for your continued loyalty. The gloves are off. Sick kids need our help...they'll get it."
My last tip of the hat goes to someone I have had no contact with, other than to buy his superb software -  Mr. Pete Dowson. The flight sim world owes a debt of gratitude to Pete, for producing FSUIPC, software that makes the integration of all of the disparate parts of hardware and software come together. We'll be talking more about Pete's handiwork in later posts.

Next up - what the new cockpit will look like...

So why is the cockpit currently in bits?

I decided that the first "build out" of my cockpit fell well short of the mission statement I published in yesterday's post. It's time to start afresh and that's what I'm doing.

Why the failure?

Bottom line, I tried to do it on the cheap. I thought that some of the off the shelf hardware was good enough, even if it didn't meet the look and feel criteria I specified in my brief. Looking at other cockpit builders, I felt that Robert Vandenberghe's set up was the way to go.

It met some of my criteria, captain's side only, controls in the correct position etc. He also has made extensive use of one of the more reasonably priced hardware vendors, Go Flight Inc.for his autopilot, throttle quadrant, radios etc. So I set off on the same path. What I really like about most of the Go Flight product range, they plug directly into any available USB port on your computer - no esoteric interface or soldering required.

Before we get too far into the hardware side of things, let's do a brief recap of the software being used and why.

Microsoft Flight Simulator (version 10. AKA FSX)
  • Why? Most commonly used flight sim. A lot of add ons are available from other vendors to heighten the flight experience
  • I use it primarily for external views (more on this topic in future posts)
  • Comes with a number of different aircraft, I'm interested in mastering the Boeing 737 (at a recent dinner, a real life general aviation pilot asked me why I was simulating a 737 and not a plane I may actually get to fly one day, like a Cessna 172. Simple answer - the 172 looks boring, not enough systems to master. So if I'm going to simulate something more complicated, may as well aim for something I'll never in reality get a chance to fly)
  • However, the 737 that comes out of the box with FSX is primitive so I then added:

 Wilco/Feel There 737 Pilot in Command (AKA PIC737 for the purpose of this blog)
  • Excellent add on to FSX
  • Has a more realistic flight planner than that provided out of the box with FSX
  • Has SIDs and STARs (departure and arrival plates for most major airports)
  • All autopilot functions are supported
  • Comes with real world airline paint jobs 
  • Taught me a lot about the skills required to "fly" a 737
  • Bottom line, a quality product - very happy with it
Navigraph nDAC
  • Organizer for SIDs, STARs, airport layout and en-route charts
  • Since these are constantly being updates, Navigraph provides a service where you can download what you need, when you need it
  • Also have some training/tutorial videos so you can learn more about flying a STAR or a hold etc.
  • A quality product and service, worth the money

So back to the hardware. I already have the yoke and pedal set from CH Products. Sorry but a joystick isn't going to cut it. You must master coordinated turns with yoke and pedal to have any chance of a realistic experience. At some point I'll upgrade to something more in keeping with the real look criteria (this for example) but for now CH is just fine.

Trying to recreate Robert's cockpit, my next purchase was the autopilot controller from Go Flight. Initially very happy with the product. It improved the flying experience immensely. No more mucking around clicking the mouse on the auto pilot controls in PIC737! One annoying aspect though, the unit would occasionally lock up mid flight. Returned it to Go Flight and they upgraded the firmware and sent it back to me. Worked ok for a while, then started playing up again. I lived with this for a while but honestly, I think it was the start of me thinking "maybe I should go large on this and try to get something better quality / less frustrating". We'll revisit this later.

Radios. You're forever re-tuning them. Not having to click on the fussy little dials in FSX is a godsend. No wonder they "invented" auto tune radios in FSX. Real pilots need to tune the radios and so shall we. Again I opted for some Go Flight units. In my mind, these are the best products from Go Flight. They have always worked flawlessly and are a joy to use. Worked with any FSX aircraft or add on I've thrown at them. Only downside - they aren't the exact size of real 737 radios...

Next, the EFIS from Go Flight. It mainly controls what you see on the navigation display in the 737 cockpit. You'll find that you will be fiddling with this all the time in PIC737, to alter the range displayed etc. Getting a piece of hardware to do this again increases the realism. At the time I bought this unit though, Go Flight didn't have a driver that worked with PIC737...

This is where things started to go really pear shaped. The frustration in getting all of the parts to work together will drive you nuts. It did with me. What it did do though was force me into doing more research, before laying out cash on more hardware. You can read more about it here if you like.

In my research I found others who have been down this path before. I'll talk more about them in the next post.

Tuesday, December 8, 2009

What's the big idea?

So why the blog? I've been messing around with Microsoft Flight simulator for years and want to take it to the next level of realism. To do so though requires a lot of time, patience and (of course) money. It also involves trial and error. The goal of this Blog is to help others embarking on this quest, to provide some pointers and hopefully reduce the time/frustration/cost/failure equation.

So what am I'm striving for in terms of realism? A good question which all simmers should ask themselves before taking detours on the wrong paths to nirvana. I wish I had been more clear when I started, I encourage you to draw up somehing similar to the mission statement below before you start.

Desired end state of Simulator
  • Boeing 737 NG cockpit
  • Controls should have close look and feel to a real 737
  • Fixed simulator (ie. it won't move around the room as I fly it...)
  • Comfortable to fly - all controls within easy reach
  • Minimal use of mouse clicks in the software - physical controls will interface with simulator
  • Based on FSX
  • Captain's station only, with ability to add first office station later if I get enough room or anyone else interested in flying with me (doubtful - no other anoraks in proximity or current social circle)
  • Wrap around screen to display external view
  • Easy to maintain/upgrade (ie. I will actually fly the thing and won't be constantly debugging code)
  • Built in stages: MIP first, center console second, overhead panel last
So this said, the rest of the blog will follow my progress (including build photos), decisions made on gear, what went wrong and how I got it back on track. Next up, why my cockpit is currently in bits...