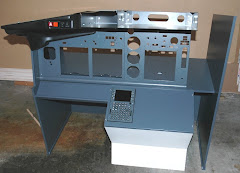
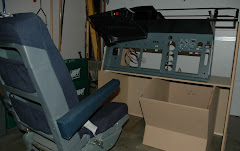
You can check out the facility here: http://www.flightexperience.com.au/darling-harbour
First impression was the place will never make money! Popped in to see what was going on and apart from a bloke working the desk, nothing. He asked if I'd like to look in and of course I agreed. What I saw was a full cockpit with a couple of jump seats for observers, wrap around screen - all looked good. We were heading out for dinner and since the bloke was now talking to someone on the phone, I decided to come back another day.

Big mistake. Turns out the sim is fully booked out and I just happened to catch them when no one was in it. Sure enough, the outlook was not promising that I would get a flight. The bloke I met briefly the first night (who I will now call Blake, since that is his name...) kindly offered to keep the place open for me an hour after they would normally close. I was on for a 9:00pm flight Wednesday night!
I've flown in the presence of others a couple of times and found it a bit daunting. This time I'd be doing it in a sim I wasn't familiar with, alongside someone who knew his stuff. Blake told me later that he is qualified to fly the real deal - I'd need to be on my game. I planned a simple flight, take off from KSFO, out towards Oakland then Point Reyes for return to 28L (I chose to fly the ILS approach).
Wednesday night rolled around and I walked down to the sim center. Since someone was finishing up his turn, I got to read through some operations manuals Blake helpfully provided. I told him I was building my own sim and was interested in what software they were using. Turns out the sim was built by a New Zealand company called Pacific Simulations Limited
From a software standpoint, FS2004 and Project Magenta were deployed. The display system was made up of 3 projectors with a wrap around screen. No details on the hardware although the manual talked about 8 computers in use. I asked if a behind the scenes tour was possible, as I found out later there wasn't a lot to see. More on this in the post flight debrief.
Also in the ops manual were "5 golden rules" for the operators of the sim. Rules 1 and 2 were along the lines of "do what the customer wants to do" and "don't let them crash". This put my mind at ease a little - this wasn't to be a check ride.
Into the cockpit. While Blake sorted out the airport and runway, I banged the short flight plan into the FMC. We both screwed up - he put me on 19R (I asked for 1R, at least I think I did - maybe nerves got to me) meaning a 180 degree turn after take off to get me over to Oakland. I jumped the gun in putting in the STAR for 28L which deleted the rest of my flight plan.... With the clock ticking, I got the plan entered again.
First impressions:
- The yoke has a much more solid feel than mine does
- Moving the control column required more force than mine and seemed to have a great range of travel
- The control column seemed low. Blake explained that it was intentionally about an inch and a half shorter, since most customers found regular height obscured the PFD
- The control column is linked to the first office side, not something I have. Also it has something akin to force feedback - I feel this really adds to the realism
- The CDU had a different tactile feel to mine... not sure which I prefer. I think the display is easier to read on mine (Engravity)
- The flight model seemed more responsive than mine
- Their TQ is very smooth - it doesn't make the same racket mine does
- There was some kind of "butt kicker" vibration device hooked up. It added realism and is now on my "must add" list
Took off, made the 180 degree turn and got the plane into straight and level flight. Engaged the AP and took a breather.
Blake was very helpful, calling out the flap settings, gear commands, speed settings etc. I didn't feel like I was being manhandled through the whole process, I felt he gauged my capabilities quite quickly and was being a true help in the experience. I picked up a number of flying tips from him that will enhance my skills and pleasure as I fly my own sim.
Onto final, Blake suggested the appropriate speeds, flaps etc. We both struggled to get the sim to stay on VOR LOC and APP, same experience I have at home. That was interesting, along with the changing altitudes the FMC called for on the approach waypoints (Project Magenta, I hope you're reading this and get it sorted out). Nice to see that even in a "professional" sim, we all suffer from the PM bug fest.
At 1000 feet I took manual control and made what I think was a pretty good landing. That cheered me up!
Decided that it didn't make a lot of sense flying the sim purely in autopilot mode. Blake set me up for some circuits, departing 28R. I'd hand fly from here on in. I think this is where I learned the most. Blake was very good at keeping me honest with the bank angles and the turning radius, when to pull out of the turn etc. It was a bit of workout holding the back pressure on the control column, while trying to make coordinated turns and leaning over the TQ to grab the gear lever etc. Came back around for a touch and go.
This is where I had a bit of an epiphany. Even though the sim sits on a fixed base, I swear the thing was moving as I turned into the bank! That's the power of the immersive visuals and the effect of looking out of the cockpit window! To get this feeling at home, I know that not only will I need to get the external visuals working (and I'm really motivated to get this done now), I will also need to build the cockpit enclosure...
It also occurs to me that I should probably build out the first officer side too. The enclosure will look a bit odd if it ends on the center panel. Oh joy - I'll be taking the whole thing apart again. I may also look at having a more realistic yoke with more accurate control column resistance and possibly force feedback. We'll see.
Anyway, back to the flying. On my first touch and go I think Blake may have helped me out a bit with the nose attitude. He gave the column a nudge and got me back on the glide slope. Touched down, ran out along the runway then gave it full throttle for a screaming pass over the poor folk who have the misfortune of living in Daly City.
Back around the circuit for a full stop landing, taxied out using the tiller handle. And with that, my 45 minutes were over.
According to Blake, the sim flies quite similar to a real 737. There are some important differences, some of the systems are inop and the visuals are not that superb. Pixilation and blocky graphics were very noticeable, especially on short final. Apparently they have a high definition projection system on order. I think (nay I hope...) that my projectors will provide a better experience. It was definitely a distraction.
Understandably, Blake was in a hurry to get home. He gave me a quick look in the back while he was powering everything down. Couldn't really see anything - the projection system was shrouded with a large blackout blanket.
Shake of the hand and a lock up of the store - I was done. It was truly a great time and I would recommend this to anyone building their own sim. The biggest eyeopeners were the difference in feel, the immersive experience and most importantly, time spent with someone who knows what they're doing. Blake told me that at this location, they only use instructors who are qualified pilots. To get 45 minutes of his time was worth it all. Wish I could do it again but they're full booked and I'm flying home for real on Saturday.
All food for thought. I'm determined to get more of the sim finished and to increase the realism.
At 1000 feet I took manual control and made what I think was a pretty good landing. That cheered me up!
Decided that it didn't make a lot of sense flying the sim purely in autopilot mode. Blake set me up for some circuits, departing 28R. I'd hand fly from here on in. I think this is where I learned the most. Blake was very good at keeping me honest with the bank angles and the turning radius, when to pull out of the turn etc. It was a bit of workout holding the back pressure on the control column, while trying to make coordinated turns and leaning over the TQ to grab the gear lever etc. Came back around for a touch and go.
This is where I had a bit of an epiphany. Even though the sim sits on a fixed base, I swear the thing was moving as I turned into the bank! That's the power of the immersive visuals and the effect of looking out of the cockpit window! To get this feeling at home, I know that not only will I need to get the external visuals working (and I'm really motivated to get this done now), I will also need to build the cockpit enclosure...
It also occurs to me that I should probably build out the first officer side too. The enclosure will look a bit odd if it ends on the center panel. Oh joy - I'll be taking the whole thing apart again. I may also look at having a more realistic yoke with more accurate control column resistance and possibly force feedback. We'll see.
Anyway, back to the flying. On my first touch and go I think Blake may have helped me out a bit with the nose attitude. He gave the column a nudge and got me back on the glide slope. Touched down, ran out along the runway then gave it full throttle for a screaming pass over the poor folk who have the misfortune of living in Daly City.
Back around the circuit for a full stop landing, taxied out using the tiller handle. And with that, my 45 minutes were over.
According to Blake, the sim flies quite similar to a real 737. There are some important differences, some of the systems are inop and the visuals are not that superb. Pixilation and blocky graphics were very noticeable, especially on short final. Apparently they have a high definition projection system on order. I think (nay I hope...) that my projectors will provide a better experience. It was definitely a distraction.
Understandably, Blake was in a hurry to get home. He gave me a quick look in the back while he was powering everything down. Couldn't really see anything - the projection system was shrouded with a large blackout blanket.
Shake of the hand and a lock up of the store - I was done. It was truly a great time and I would recommend this to anyone building their own sim. The biggest eyeopeners were the difference in feel, the immersive experience and most importantly, time spent with someone who knows what they're doing. Blake told me that at this location, they only use instructors who are qualified pilots. To get 45 minutes of his time was worth it all. Wish I could do it again but they're full booked and I'm flying home for real on Saturday.
All food for thought. I'm determined to get more of the sim finished and to increase the realism.